


PDFs are one of the most highly requested features in the Retool community and plenty of Retool developers are looking for extended functionality to generate PDFs for reporting, invoicing, contracts, and more.
We wrote about the two available options back in 2021, but here is an updated version of that blog post with some new possibilities and updates to those that were previously available. In this article, we’ll look at the 4+ main ways to generate PDFs in Retool, including Retool native options and options outside of the Retool platform, with tutorial examples.
Common use cases for PDFs in Retool
PDFs are an integral part of most business processes and creating optimized systems to generate and handle PDFs in internal apps in Retool is highly important.
Typical examples of use cases we often see include generating invoices and receipts, and producing billing and pricing quotes, contracts, BOMs, and purchase orders within company's internal tools and signature workflows. Since the majority of these uses involve being sent to external clients and customers, these PDFs must reflect company branding and professionalism.
New to Retool? Use our link for 20% off your first 6 months!
Overview of PDF options in Retool
Retool native options:
- Option 1: PDF Exporter query. This integrated option creates very simple text-based PDFs using markdown only.
- Option 2: Utils downloadPage. This integrated tool creates a kind of screenshot of the Retool canvas, that can include tables, charts, and more on a single page.
- Option 3: Custom component. It's possible to build a PDF exporter using the HTML2PDF/JSPDF libraries and some custom code, but good coding knowledge (and some time) is required. This is by far the most customizable option within Retool.
Best external API options:
If Retool native options or custom components don’t fit your use case, it’s also possible to use an API to generate PDFs. This option is the most flexible and customizable, but might be more costly, and requires maintenance of the external API as well as the Retool app. Here are some options:
- APItemplate.io. This option is good for those on a budget looking for simple templates, like invoices or contracts
- Carbone.io. This option is highly customizable with code.
- Hybiscus. This is a good option for reports and analytics.
Now let's jump into the details.
Retool’s native methods for PDF generation
There are currently two ways to use Retool’s native features to generate PDFs, and the option to create a custom component with traditional code. All options have benefits and limitations, so let’s dig into some of their features.
Option 1: Retool’s PDF Exporter query
🌟 Best for: Very (very) simple PDF documents where formatting is unimportant. Any PDFs that are predominantly simple text, where the layout can be defined using markdown alone, and doesn’t need charts, tables, or more complex formatting, such as simple reports or internal summaries that use dynamic text from a Retool app. This option is also best for those looking for a basic option that is integrated into Retool and doesn’t require extensive custom coding or an external API.
⬇️ Key limitations: The PDF exporter only supports markdown, and therefore formatting is minimal. It’s not really possible to get a professional-looking PDF or integrate features like tables or charts that are important for invoices, purchase orders, etc.
The PDF Exporter query simply formats text into a PDF document using markdown. Since Markdown is a lightweight markup language, it’s not exactly ideal for formatting anything complex. Below is an example of how you can use the PDF exporter query in your Retool application. Follow the steps in the next section for more information on how to use it.
More limitations include:
- Inability to change font size - the font is quite large and only adjusts according to header demarkation in Markdown
- Formatting into tables is possible, but only for smaller datasets and customization is limited
- It doesn’t allow for HTML formatting so can be more difficult to create professional-looking PDFs
How to use the Retool PDF Exporter
Inside your app create a new query under the ‘Code’ section and select “PDF Exporter” from the resource dropdown. In the PDF Exporter’s value box, you can use Markdown to define the text and formatting and pull data from your app into the Markdown layout using JavaScript escape hatches. Running the query will also automatically download the PDF to your computer.
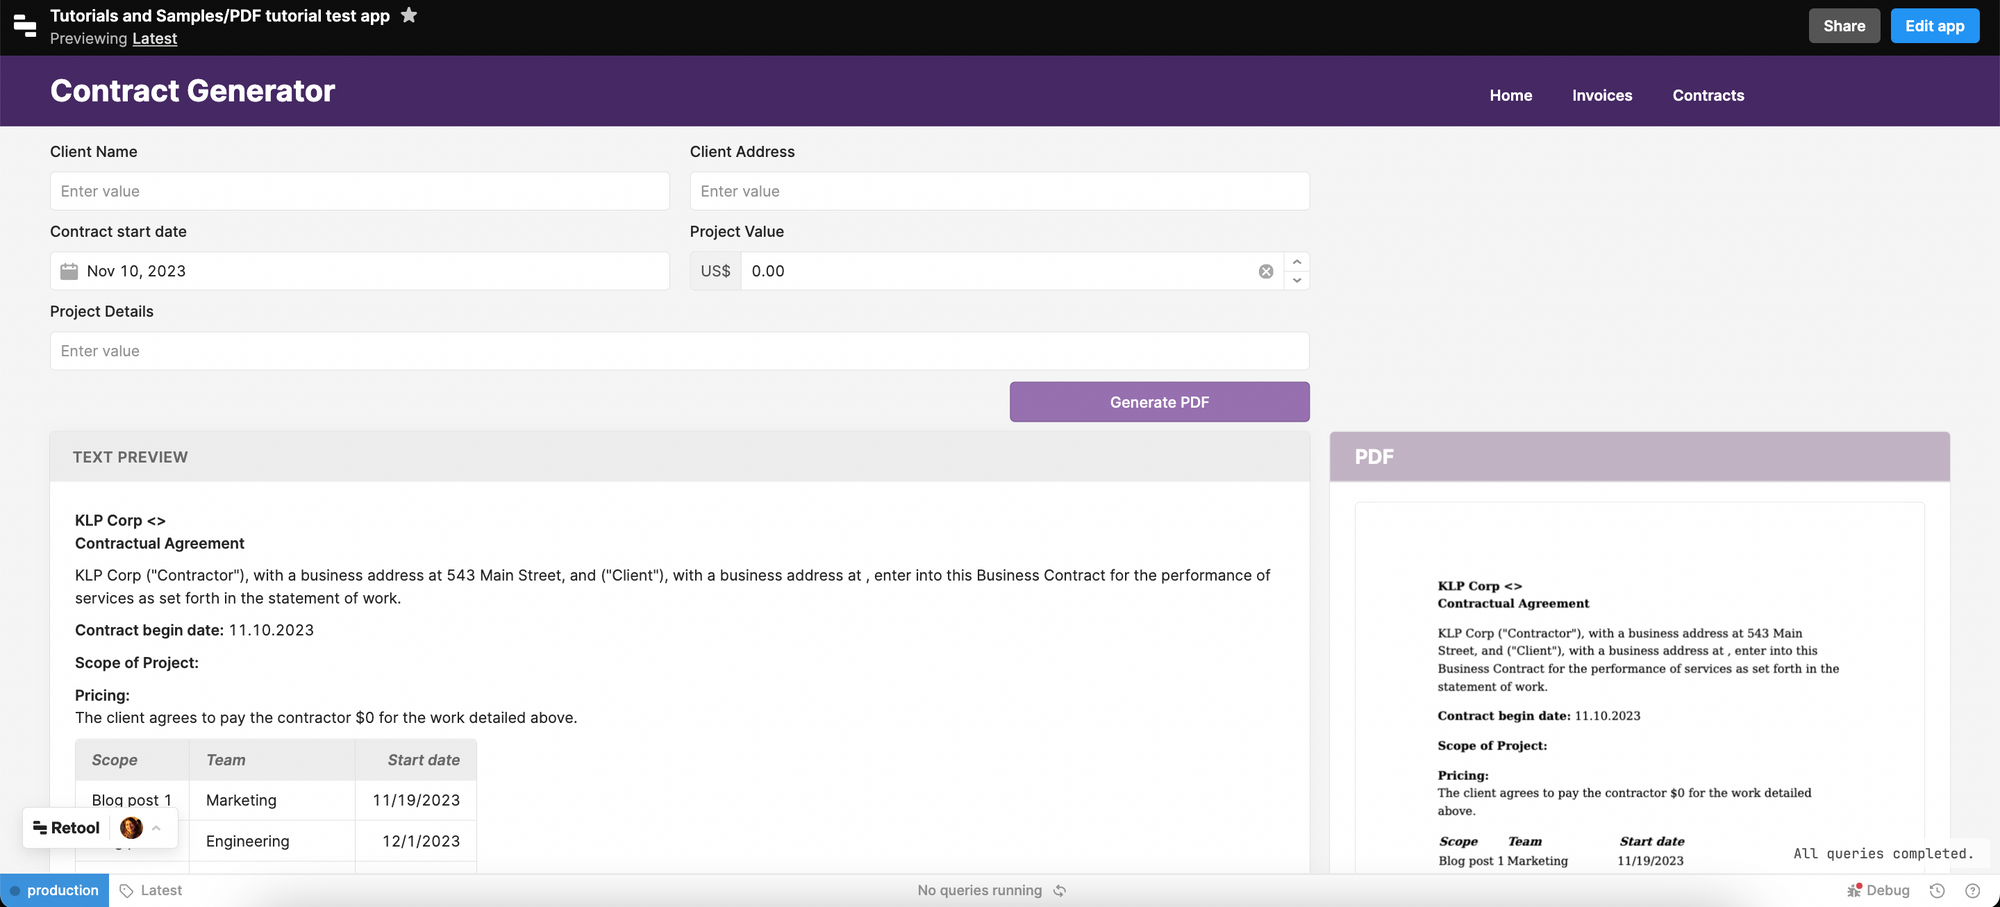
Below is an example of a simple contract generator app in Retool. We used input components such as the text, date, and number inputs to manipulate data, which is then transformed into a PDF. The PDF exporter query will return a PDF in Base64 Binary code which can also be retrieved from within the app, as seen in the ‘output’ below.
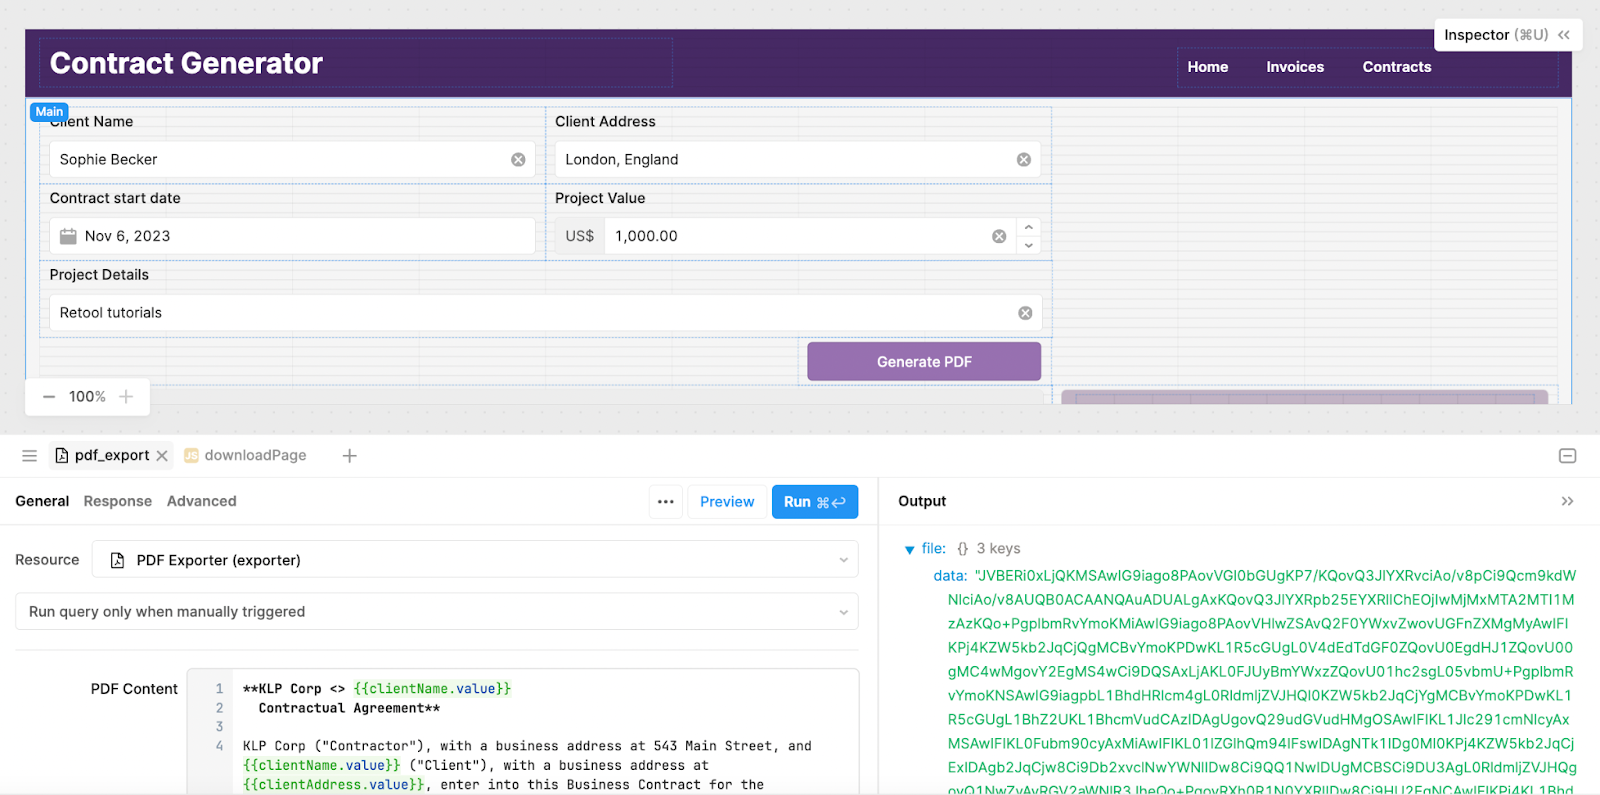
Below is what the full query looked like in markdown. We included the static contract content as text and used the curly braces references to pull in the dynamic values of the inputs from the app. You can use the curly braces to insert any JavaScript, so as an example we used the moment() library to generate the date automatically.
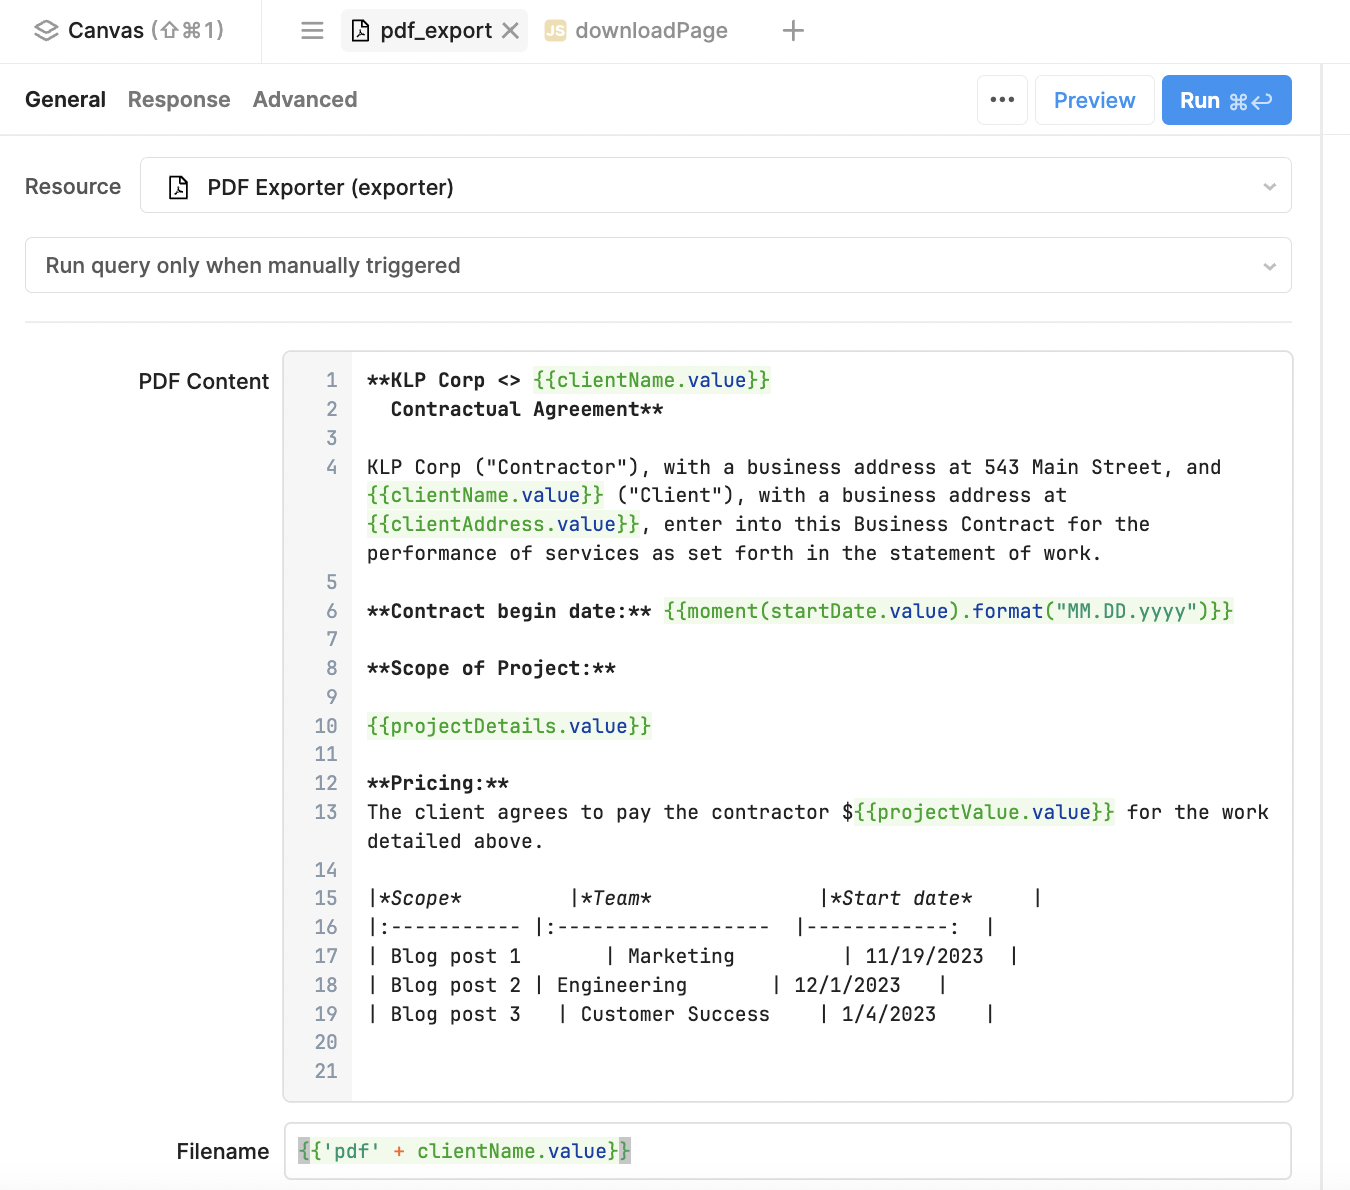
You can set the table to hold dynamic values from your app, but this requires a JavaScript transformer to format it as Markdown. More info here. You can also define a dynamic filename in the field below.
And here is the resulting PDF that was downloaded:
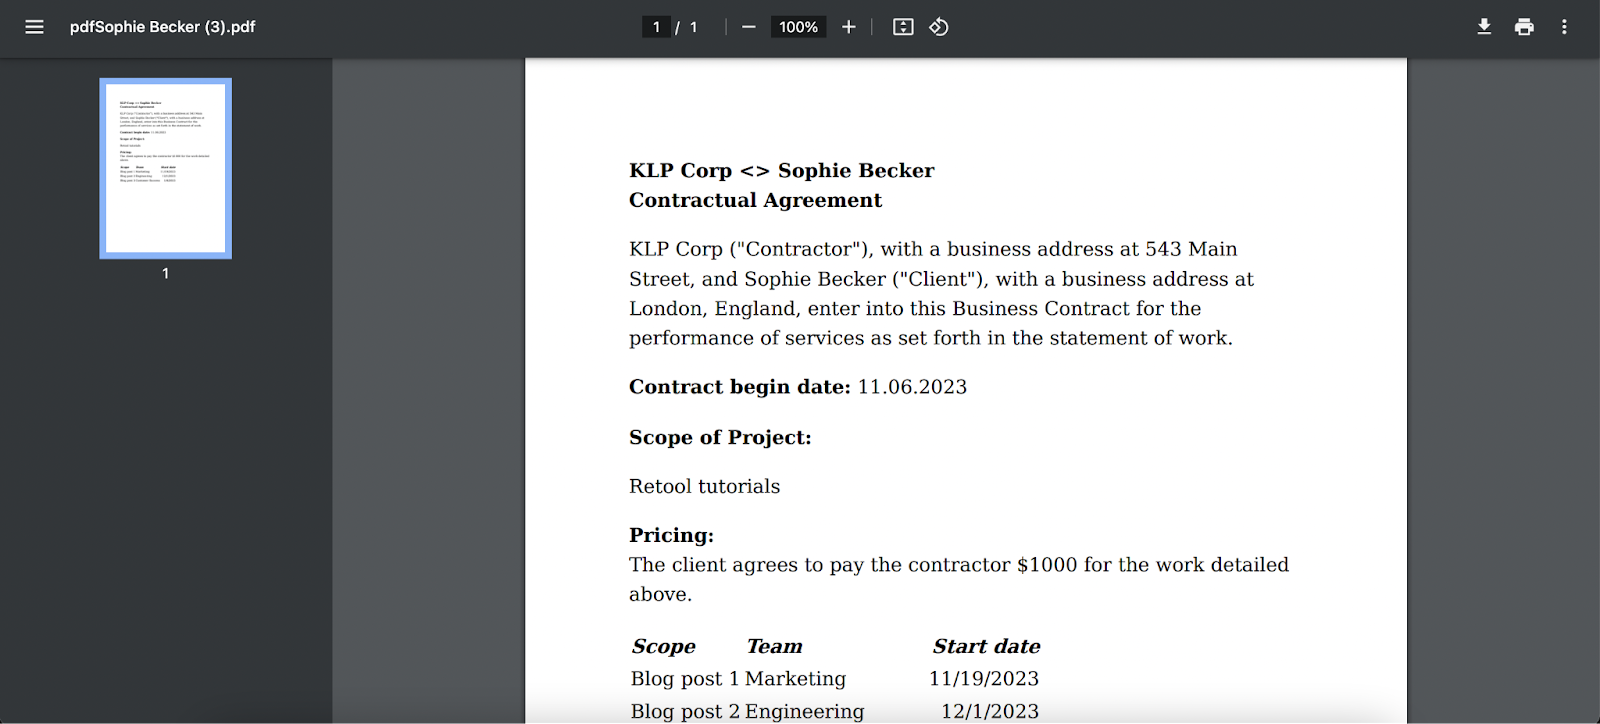
As you can see, the PDF exporter is suitable for basic, text-based PDFs (which are searchable by text), but the formatting of font, layout, text size, and more is limited. We included a basic table for illustration purposes, which exports as a very basic table option.
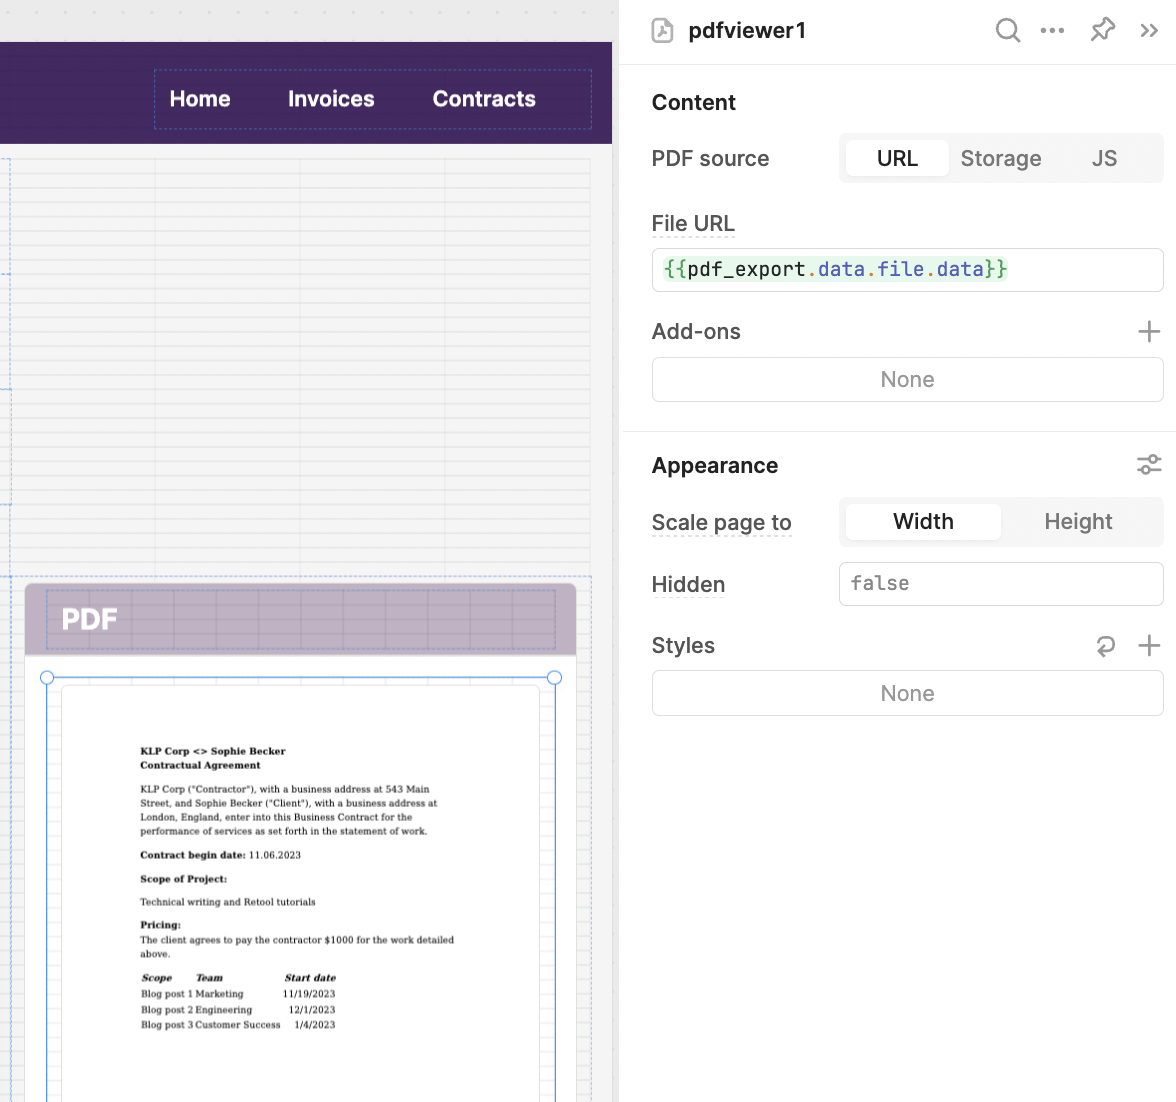
Once generated, you can also display the PDF in the PDF viewer component by referencing the base64 code with {{pdf_export.data.file.data}}.
For this app example, we also have a preview text option for the user to see the resulting text before printing to PDF.
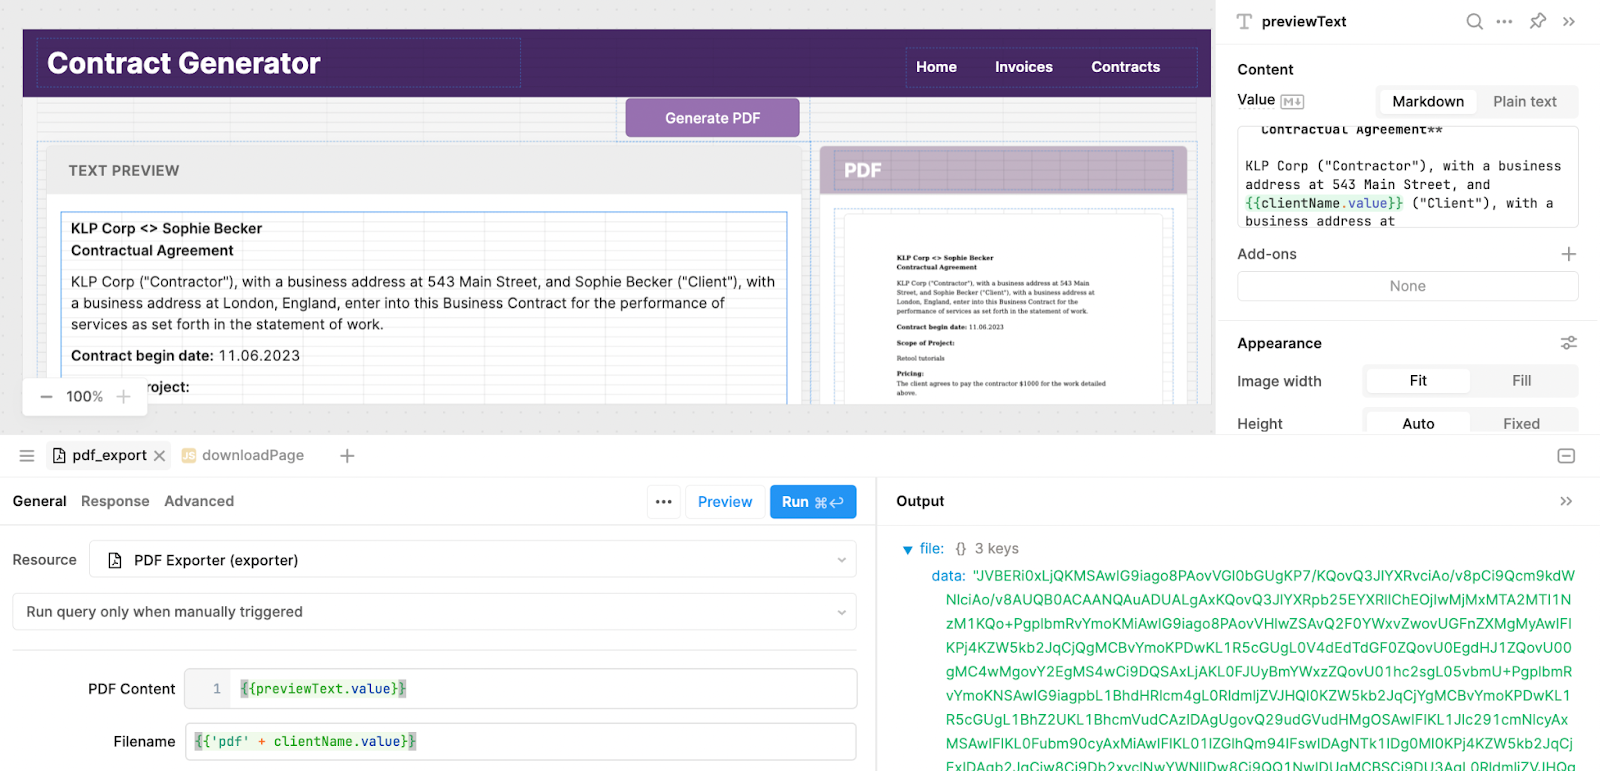
To make things more straightforward, we defined the markdown we wanted for the PDF in the textbox and then referenced the textbox value {{previewText.value}} in the PDF exporter query.
Summary: Retool’s PDF Exporter is a simple method to produce a very basic text-based PDF, with no need for specific formatting in terms of exact font size, or text alignment etc., this is a good option.
Option 2: Retool’s ‘utils.downloadPage’ utility
🌟 Best for: Simple PDFs made from a ‘print screen’ of the Retool canvas. It can be useful for creating single-page reports based on charts and tables from a simple app. Again, this is a good Retool-integrated option that doesn’t require much additional coding or using an external API.
⬇️ Key limitations: The layout and aesthetics of the download page utility are more flexible than the PDF exporter option, though can require some extra fiddling to get right. PDFs can only be generated on a single page and there is currently no way to split them, so long PDFs are generated rather than multi-page ones. It also has some security issues where the PDF can be manipulated in the HTML inspector (see more below).
This option uses the utils library that is built into Retool, so to use this function you need to run a JavaScript query. You can then use ‘selectorsToExclude’, ‘componentsToInclude’, ‘componentsToExclude’, and more (see Retool docs for full scope) to define the components that you do or do not wish to include in your PDF.
Here is an example:
utils.downloadPage("Weekly report" + " " + moment().format("MMM Do YY"), { componentsToInclude: ["container2"] });
Here is what it looked like in our example app:
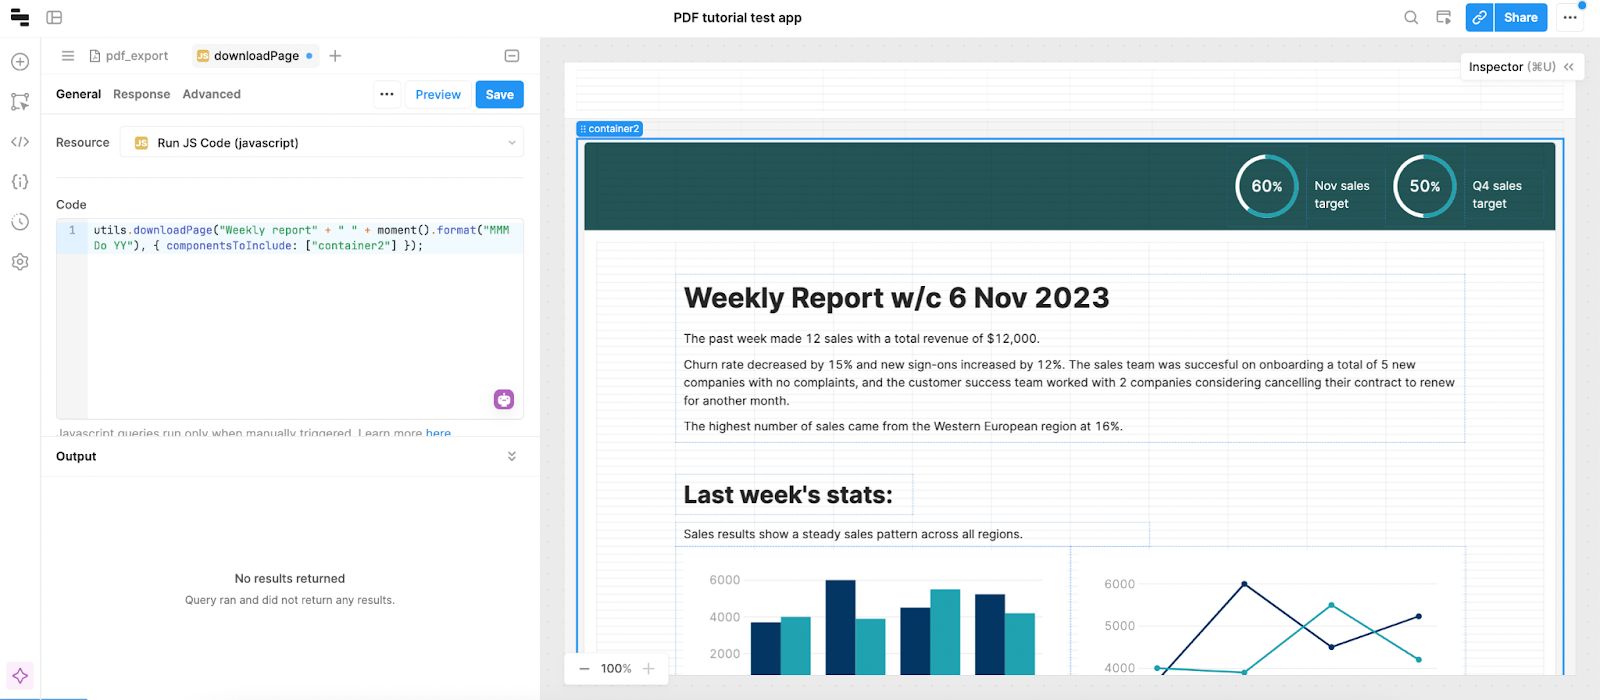
The utils.downloadPage option essentially downloads the current Retool ‘page’ as a single-page PDF (basically a Retool print screen). This works best if everything you want in the PDF is all inside one container component, and you only need a single page PDF.
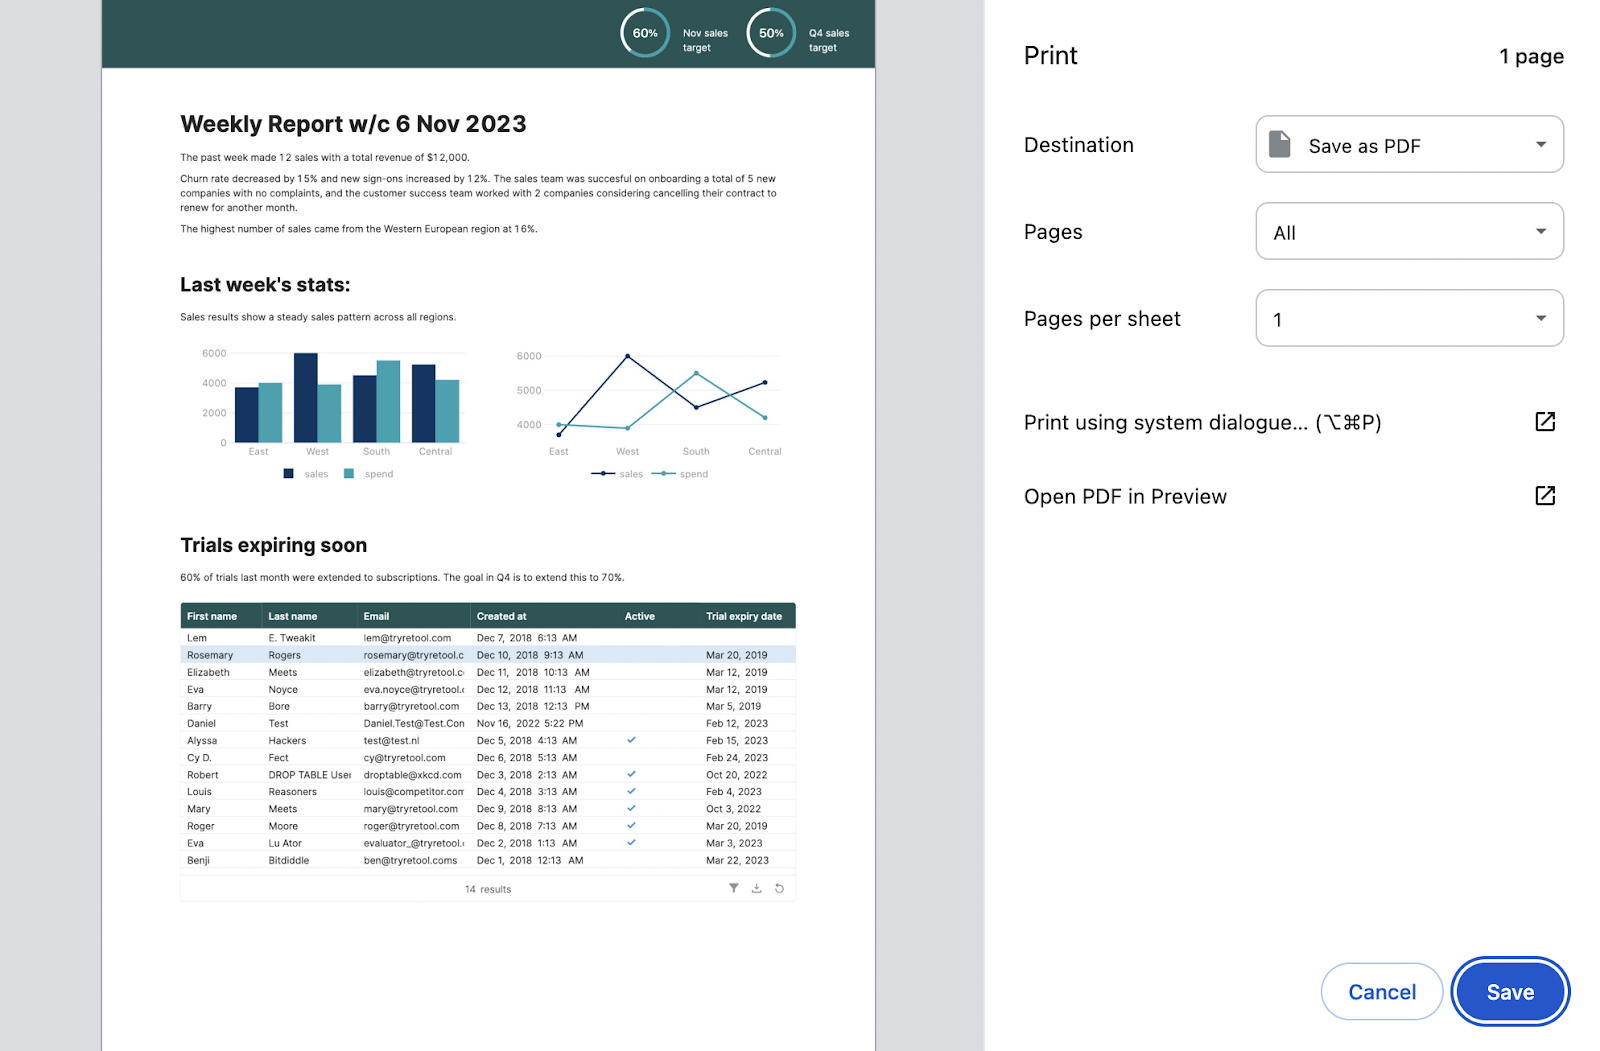
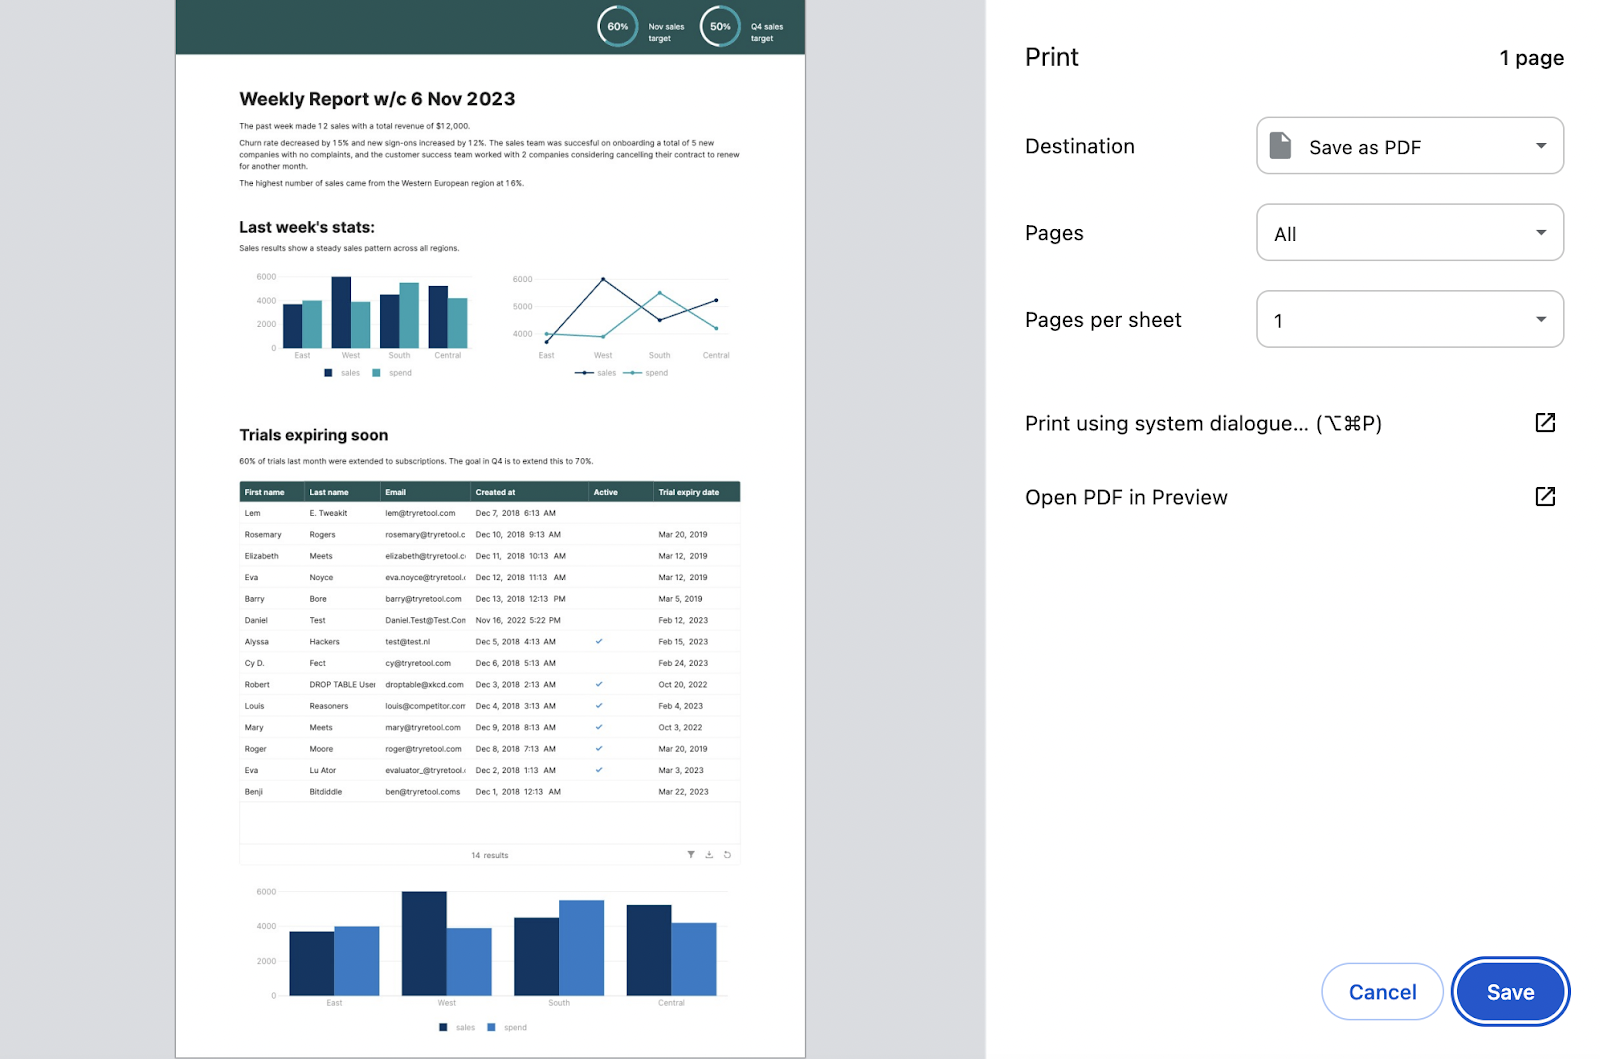
Here is the resulting PDF in the print preview:
While this may not be an issue for some use cases, it’s an important consideration for any PDFs that are generated from business logic or app data that needs to be accurate and secure. Since most people will trust PDFs as a static, ‘locked’ document, this is vulnerable to malicious intent from any users.
How to use the utils.downloadPage option
The best way to use the utils.downloadPage option is to have a separate container on your Retool canvas that creates a kind of preview of the PDF. This allows you to manipulate the layout of the components within the container, which is reflected directly in the resulting PDF. That way, you only need to reference the container itself in the JavaScript query, and the nested components are included already.
Though it takes a bit of fiddling, it’s possible to set up the container to reflect print dimensions, so that the PDF is also printable. Generally, it’s best to set the container up to the full width of the Retool app canvas, as otherwise components and text become stretched and skewed.
We did note some issues with the sharpness of text and graphics when using the ‘scale’ variable in the JavaScript query, and not much improvement on the sizing of the page, so we might recommend a trial-and-error approach to sizing the container and components instead.
Here is an example of a PDF that was not designed to print size: the resulting PDF simply becomes longer. This may be suitable for PDFs that will only be used online, but less so for anything that needs to be printed.
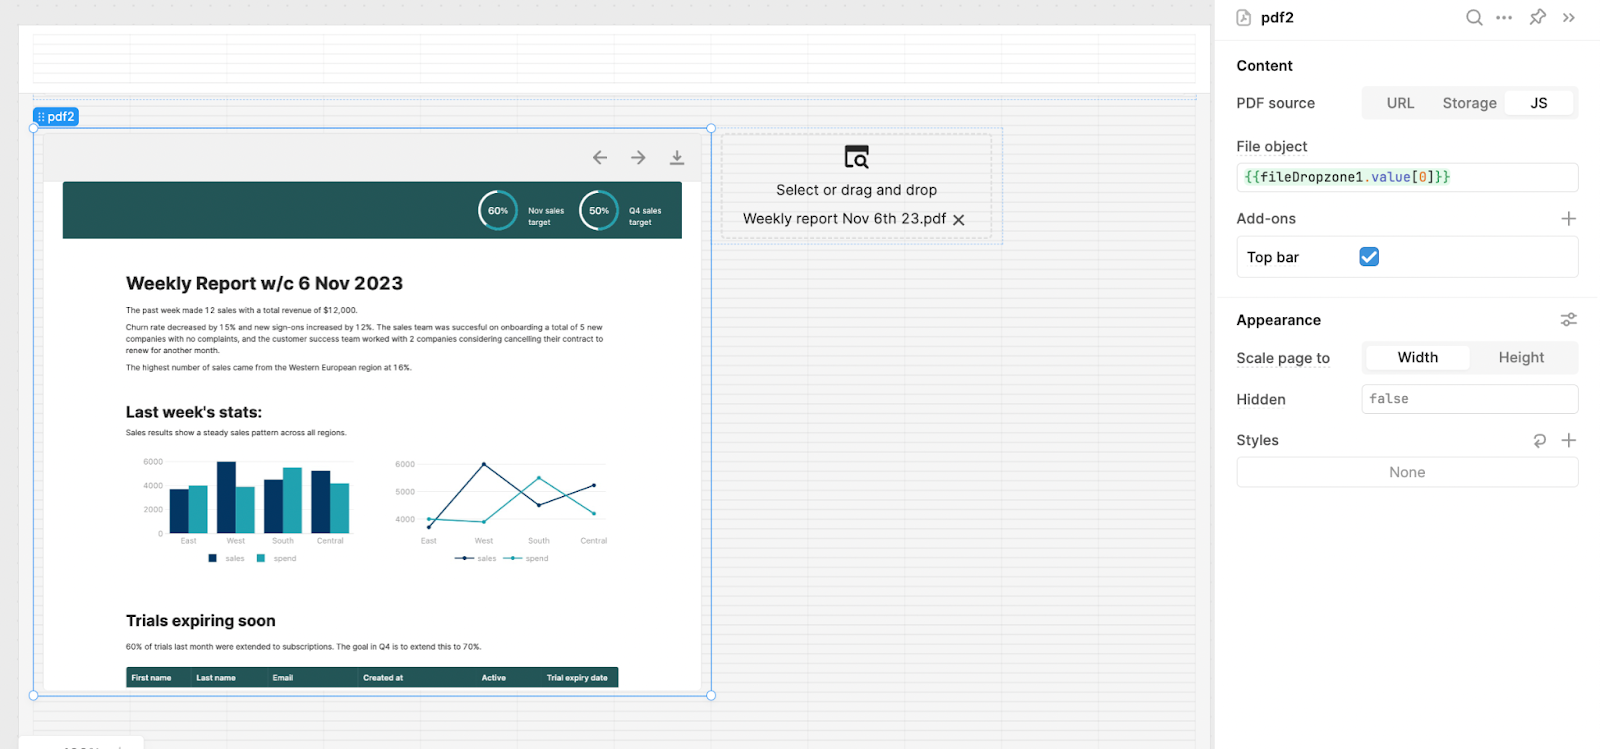
Once the PDF has been generated, there’s unfortunately no way to reference the utils JS query response to pull the PDF back into the app directly. So, to solve this problem, we added a file dropzone and a PDF viewer that references the file with {{fileDropzone1.value[0]}}, so users need to drop the PDF back into the app to keep working with it in Retool.
Summary: If you are looking for a simple PDF generator and can get all you need on a single page, this will be a better option for you than the first. Nevertheless, it has a major security flaw that must be considered before implementing with sensitive data.
Option 3: Custom HTML component (from the Retool community)
🌟 Best for: Full customizability. This option allows you to create the PDF exactly how you want it, provided you can code it yourself.
⬇️ Key limitations: This option requires you to create a custom component in which you code the logic using JavaScript and the HTML2PDF or JSPDF library - requiring good knowledge of JavaScript, HTML, and CSS to get the best results. It also will need more maintenance as a custom option and will require more time to initially set up. Each code library has its limitations.
This option is a firm developer favorite that has been explored mostly on the Retool community forum, nevertheless, it requires you to code the entire functionality, which is time-consuming and prone to breakage. This is potentially the best option for those who need a relatively complex PDF option, are on a budget (so don’t wish to use an API), and who have the time and skills to build the component out.
Credit to @Church and @Jmikem for these options using HTML2PDF, including the JSON they provided to the community. You can read the HTML2PDF.js documents here.
Some notes on this option:
- You need a lot of HTML and CSS knowledge to build out a decent PDF
- There are size limitations on the page and potentially the inability to generate multi-page PDFs with breaks
- This option creates an image-only PDF, which is not searchable by text
- It can sometimes generate extra blank pages due to sizing issues
- It’s not possible to hide the custom component since custom components are built in iFrames
- It should now be possible to print directly from the app using window.print()
Credit to Bradly Matthews for an option using Handlebars.js. He provides the full JSON file to download and test in your environment.
Some notes on this option from Bradly:
- This option uses JSPDF (JavaScript) and supports pagination
- It doesn’t support images well due to CORS issues
- It does allow for search by text
- It’s certainly not a perfect option and requires knowledge of handlebars, but can be customized
Summary: The custom component option is the most flexible native Retool option but requires extensive custom code with a library like HTML2PDF or JSPDF, so is only suitable for developers. Each option has its limitations.
Using an external API for PDF generation
While the Retool native methods do produce a PDF, the integrated options are relatively limited in scope and customizability, and the custom component option requires a lot of development time and knowledge. A good way to work around these drawbacks is to use an external API for PDF generation (though these options are rarely free).
Using an external API can allow for more elaborate formatting, easy customization, and straightforward referencing to all your Retool data, without requiring much development knowledge. Once set up, creating professional-looking PDFs is quick and easy.
Here are some examples of APIs we would recommend.
APItemplate.io
🚀 Good for: Affordable PDFs with a simple editor that doesn’t require code
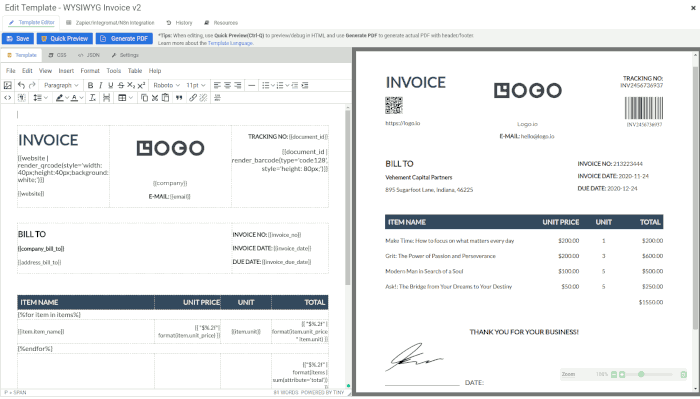
With APItemplate.io it’s possible to create professional-looking PDFs with simple templates and generate them dynamically from Retool via an API call. We found APItemplate.io to be one of the easiest to use, as it provides both a low-code WYSIWYG (what you see is what you get) editor and the option to code with HTML. With a little fiddling with the code, it’s even possible to add charts and more complex data.
For a walkthrough on how to connect to the API and create a PDF, jump to our tutorial.
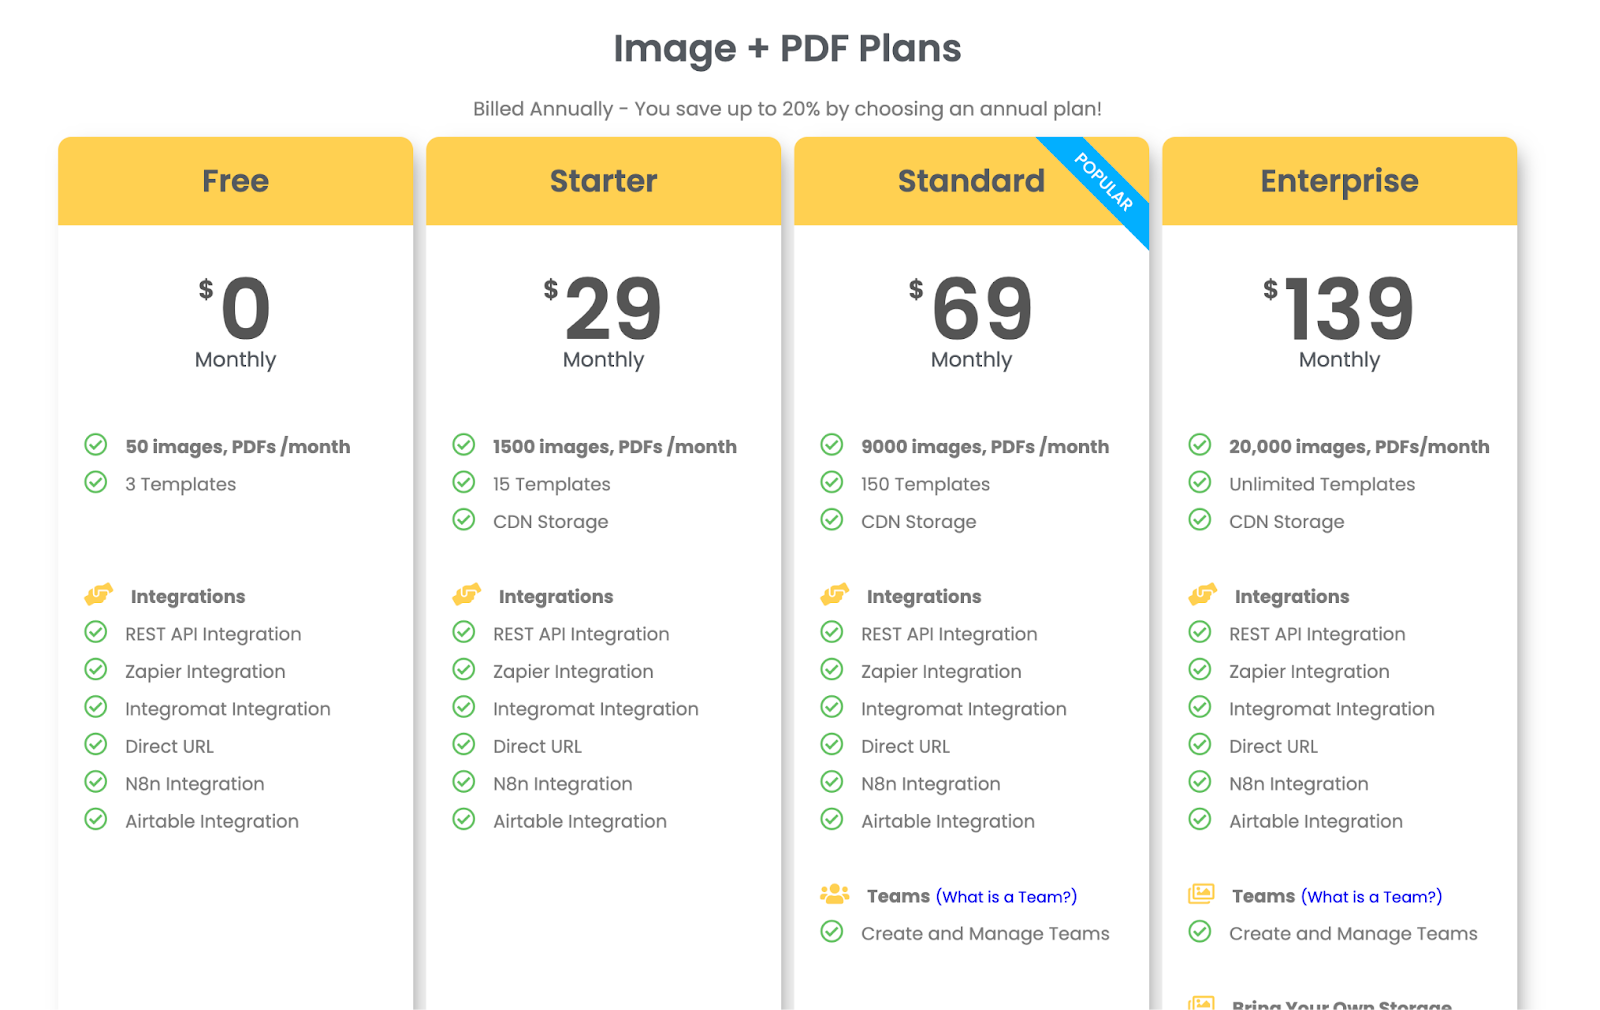
APItemplate offers a generous free option of 50 PDFs per month, and paid tiers allow for monthly PDF generation in the thousands. In our opinion, this is the most affordable option with straightforward pricing.
Carbone.io
🚀 Good for: Highly customizable PDFs using code
Thanks to Bradly Mathews for coming up with this solution for PDF printing. Carbone.io is probably the most costly and still requires a decent amount of coding to make the best-looking PDF. Nevertheless, the resulting PDFs are very professional and perfectly suitable for customer-facing options such as invoice generation and more.

For higher quantities, it could be quite expensive, but there is also an open-source community version that may be a better option.
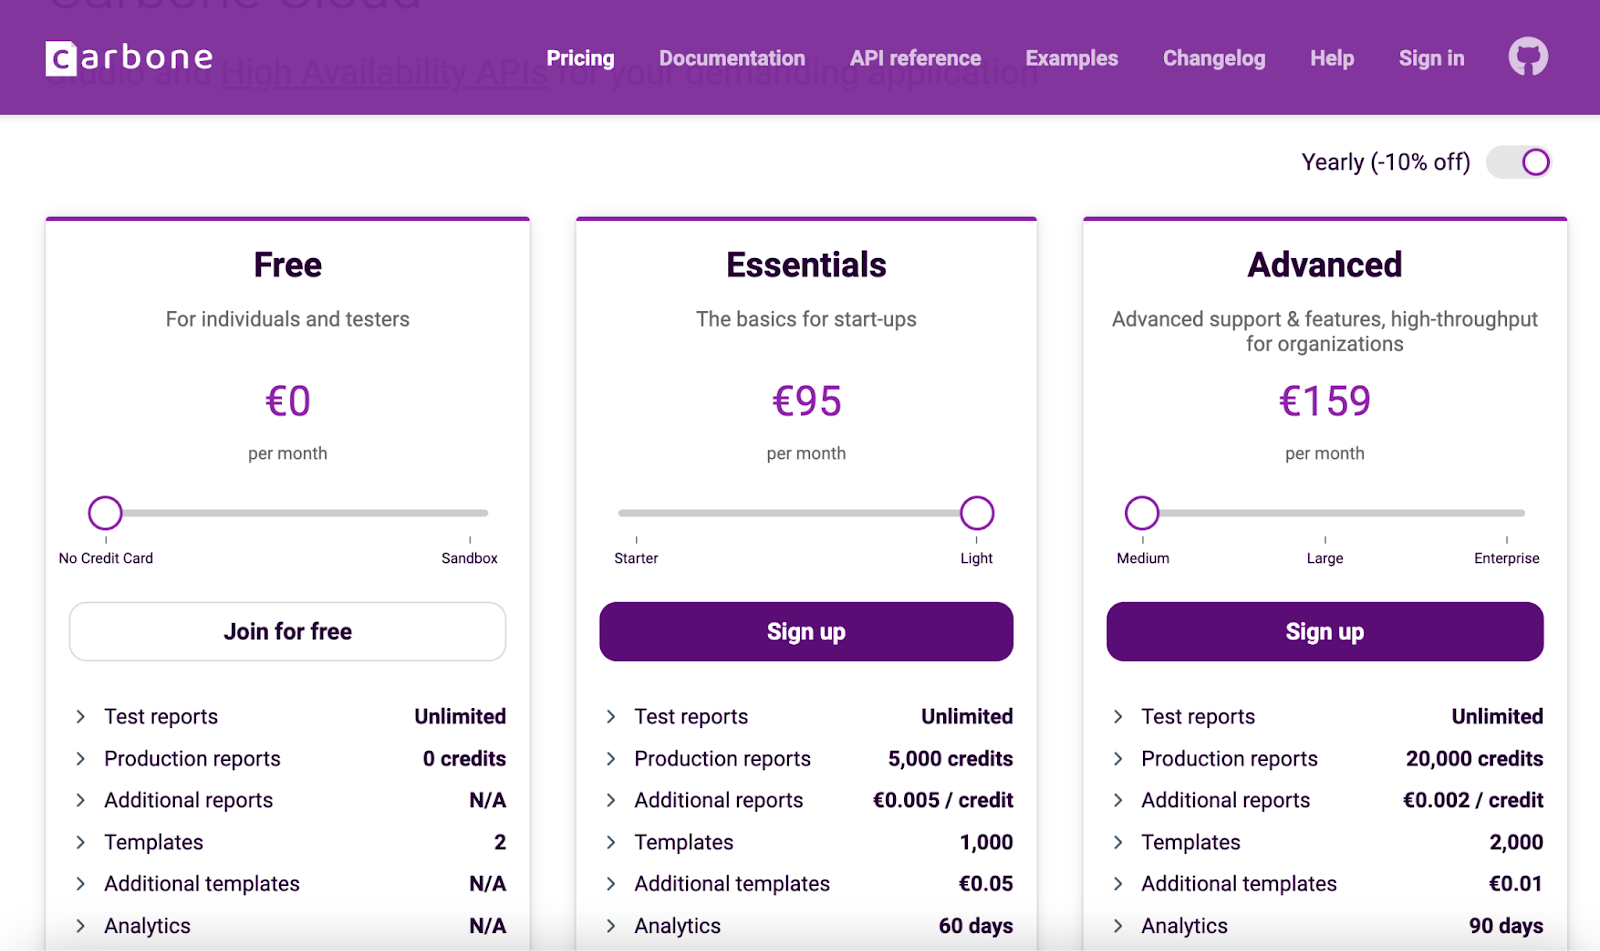
Test reports are watermarked and therefore not suitable for use.
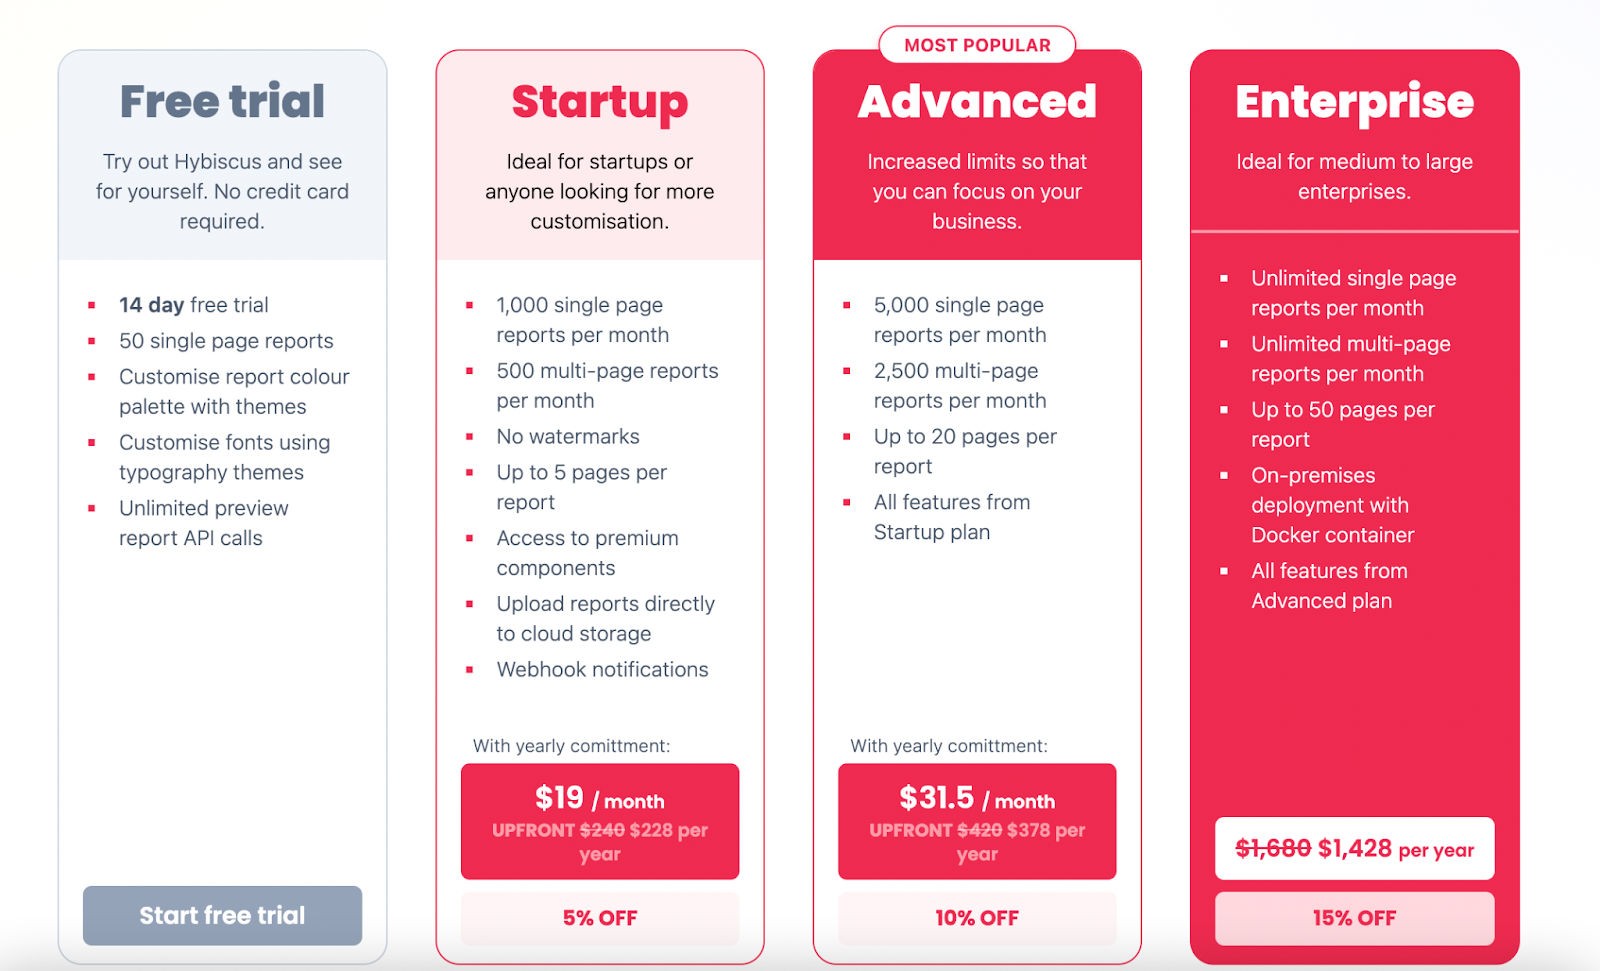
Hybiscus
🚀 Good for: charts and nice looking reports
Hybiscus is a good option for great looking reports and charts. We walk through exactly how to use it in our PDF Report generator tutorial.
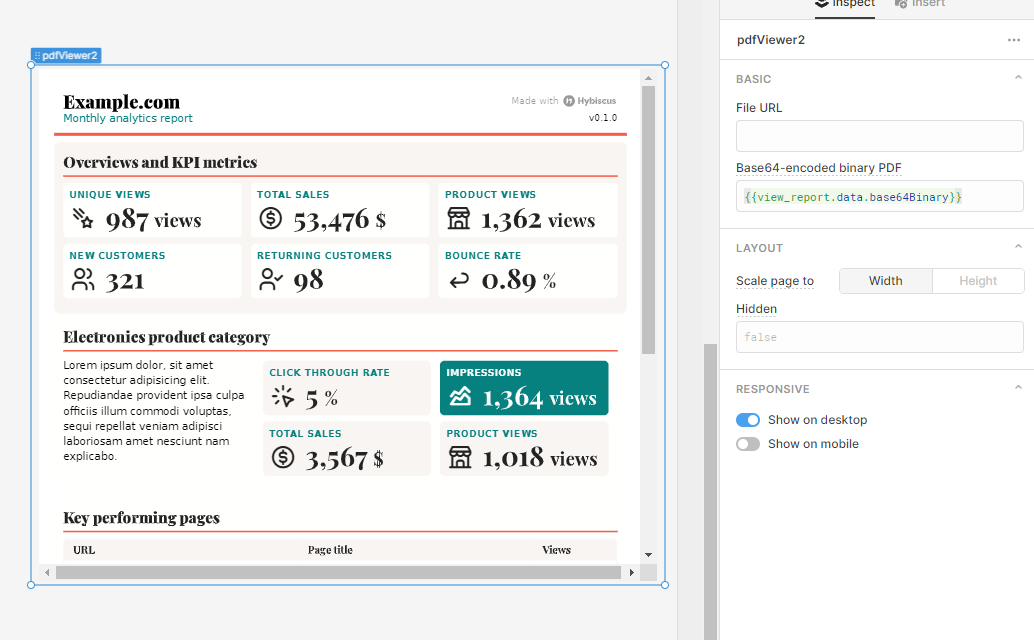
The price point for Hybiscus is much more in line with the pricing for APItemplate.io and should be affordable for those with a medium load of PDFs to generate.
Tutorial: Generate a PDF Invoice with Retool & APITemplate.io
To give you an example of how you might generate a PDF using an external API, here’s a walkthrough of how we made a contract using APItemplate.io.
Choosing a Template and Using the Editor
The first step in this process is to go to their site, sign up and start making a template. After signing in, you are directed to your dashboard, which shows your subscription information, remaining API calls and most recent transactions.
Under your Dashboard on the left hand menu is ‘Manage Templates’. Click there and then you’ll see a button ‘+ New Template’. Now, there are various templates to choose as a starting point, depending on what you’d like to do and how you’d like to do it.
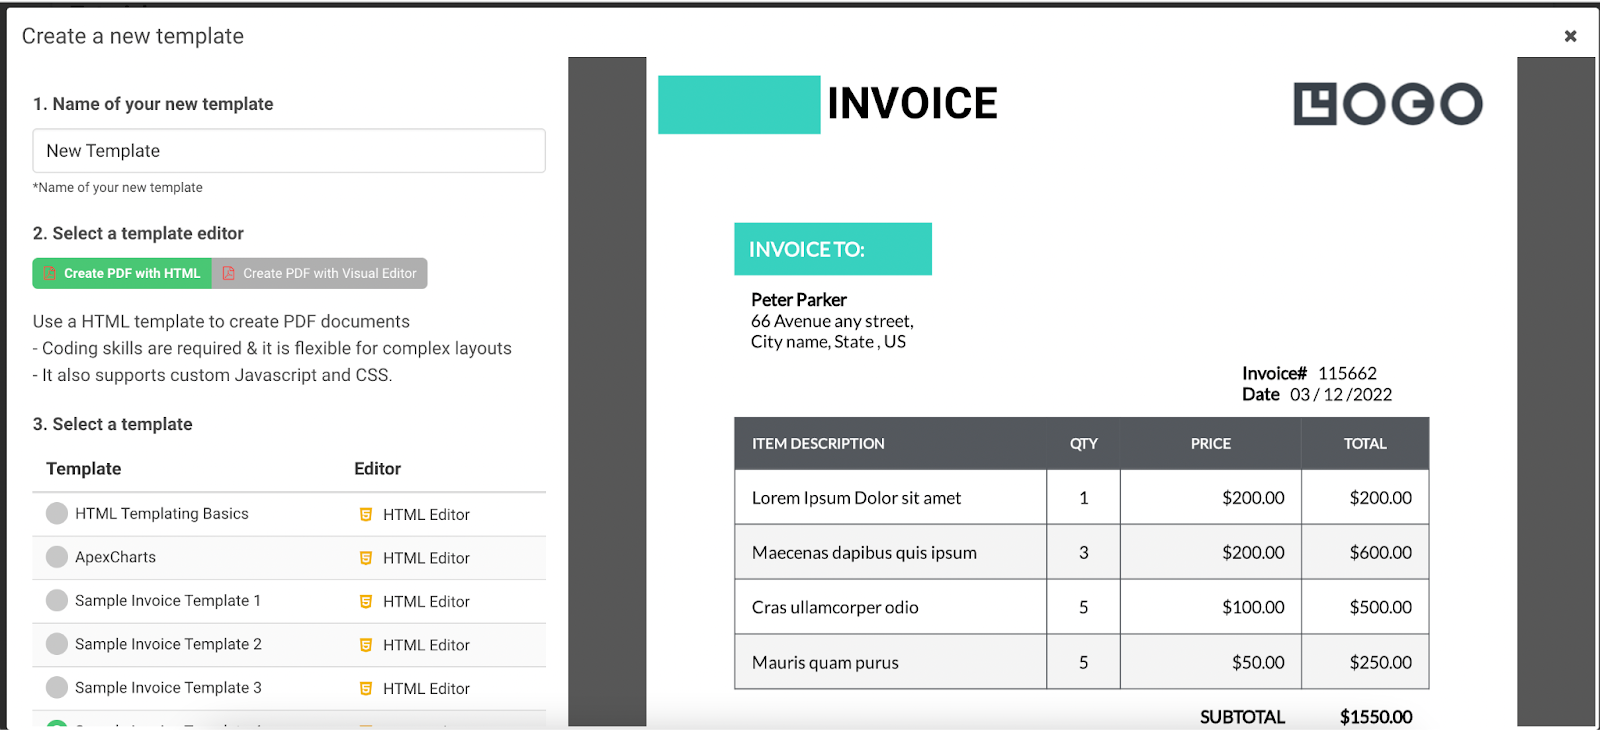
For this example, we used the Visual Editor to create a very basic template. We selected the PDF template editor and the Business Contract Sample, which uses a WYSIWYG editor (“what you see is what you get”). This editor requires little to no coding, so is very easy to use.
After naming your new template and clicking on ‘Create’, you will be taken back to your Manage Templates page. Find your new template and click edit. You will now see the WYSIWYG editor on the left and the template preview on the right.
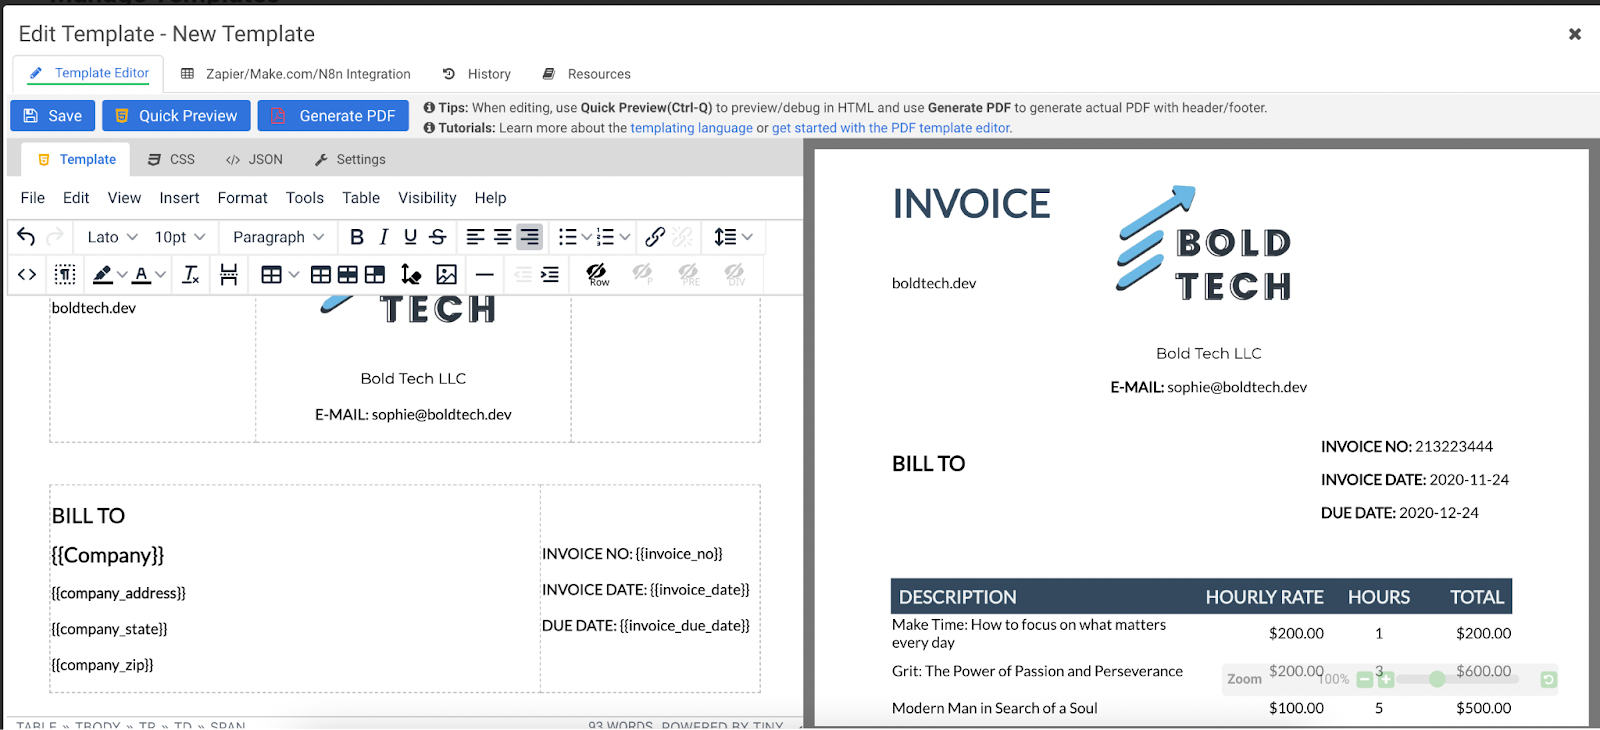
You can see the exact code under the JSON tab.
Connecting to the API
Once the template is finished and saved, you will need two pieces of information from APITemplate to connect your new template with your Retool app:
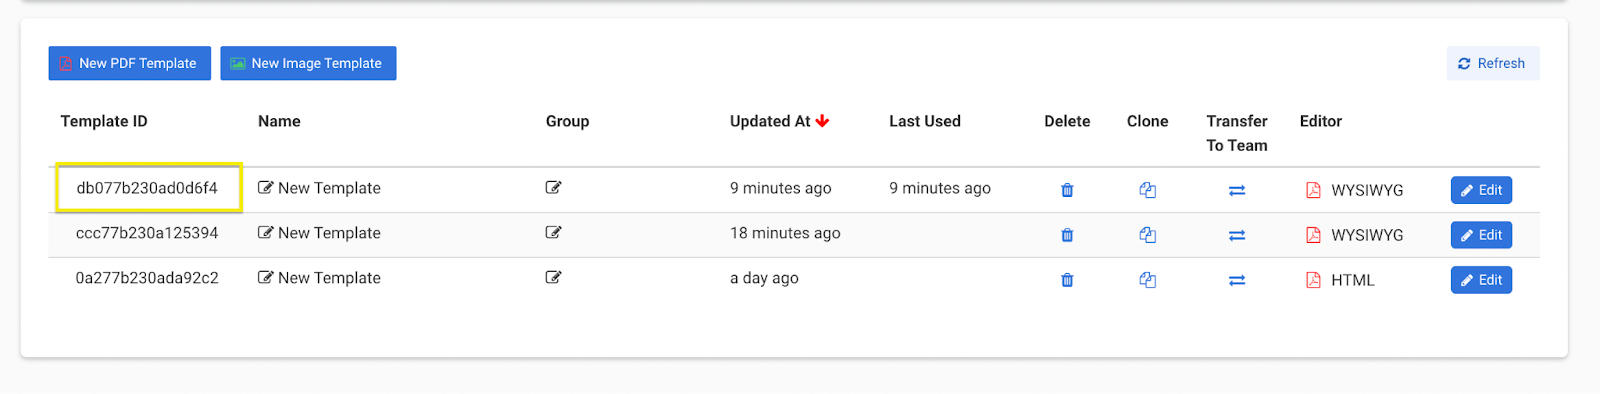
1. Your template ID. This can be found under ‘Manage Templates’ in your profile:
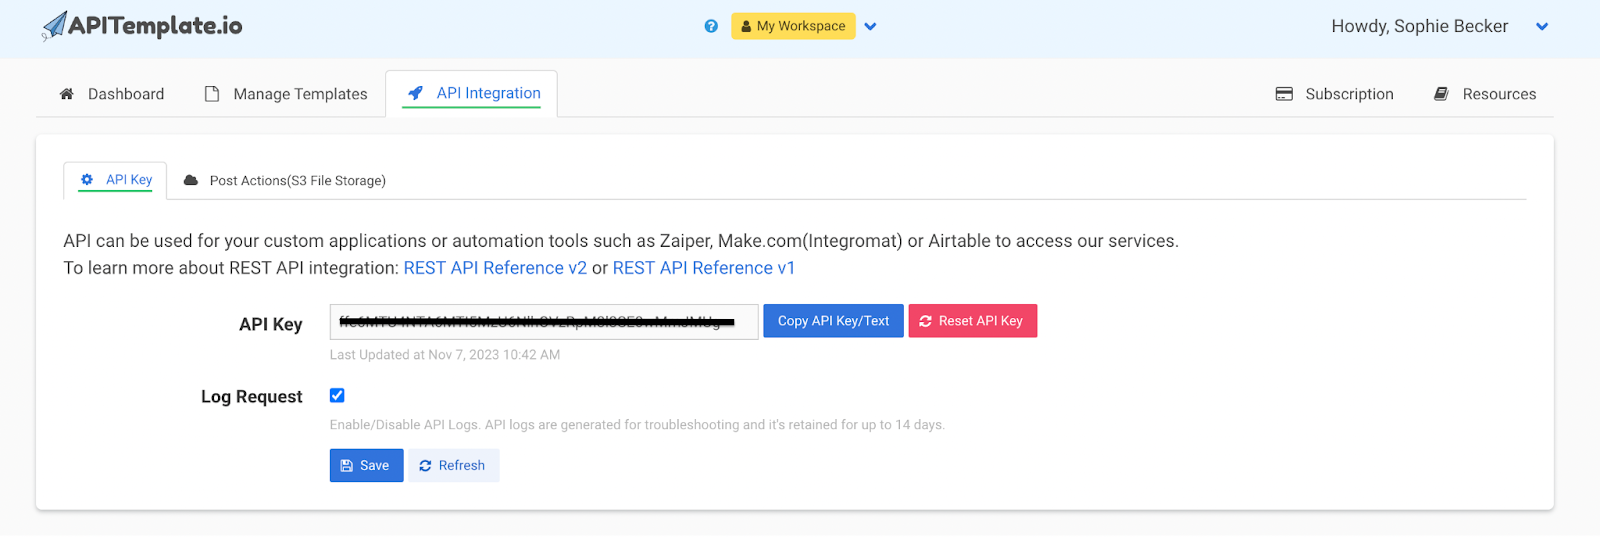
2. Your API key. This can be found under ‘API Integration’ in your profile:
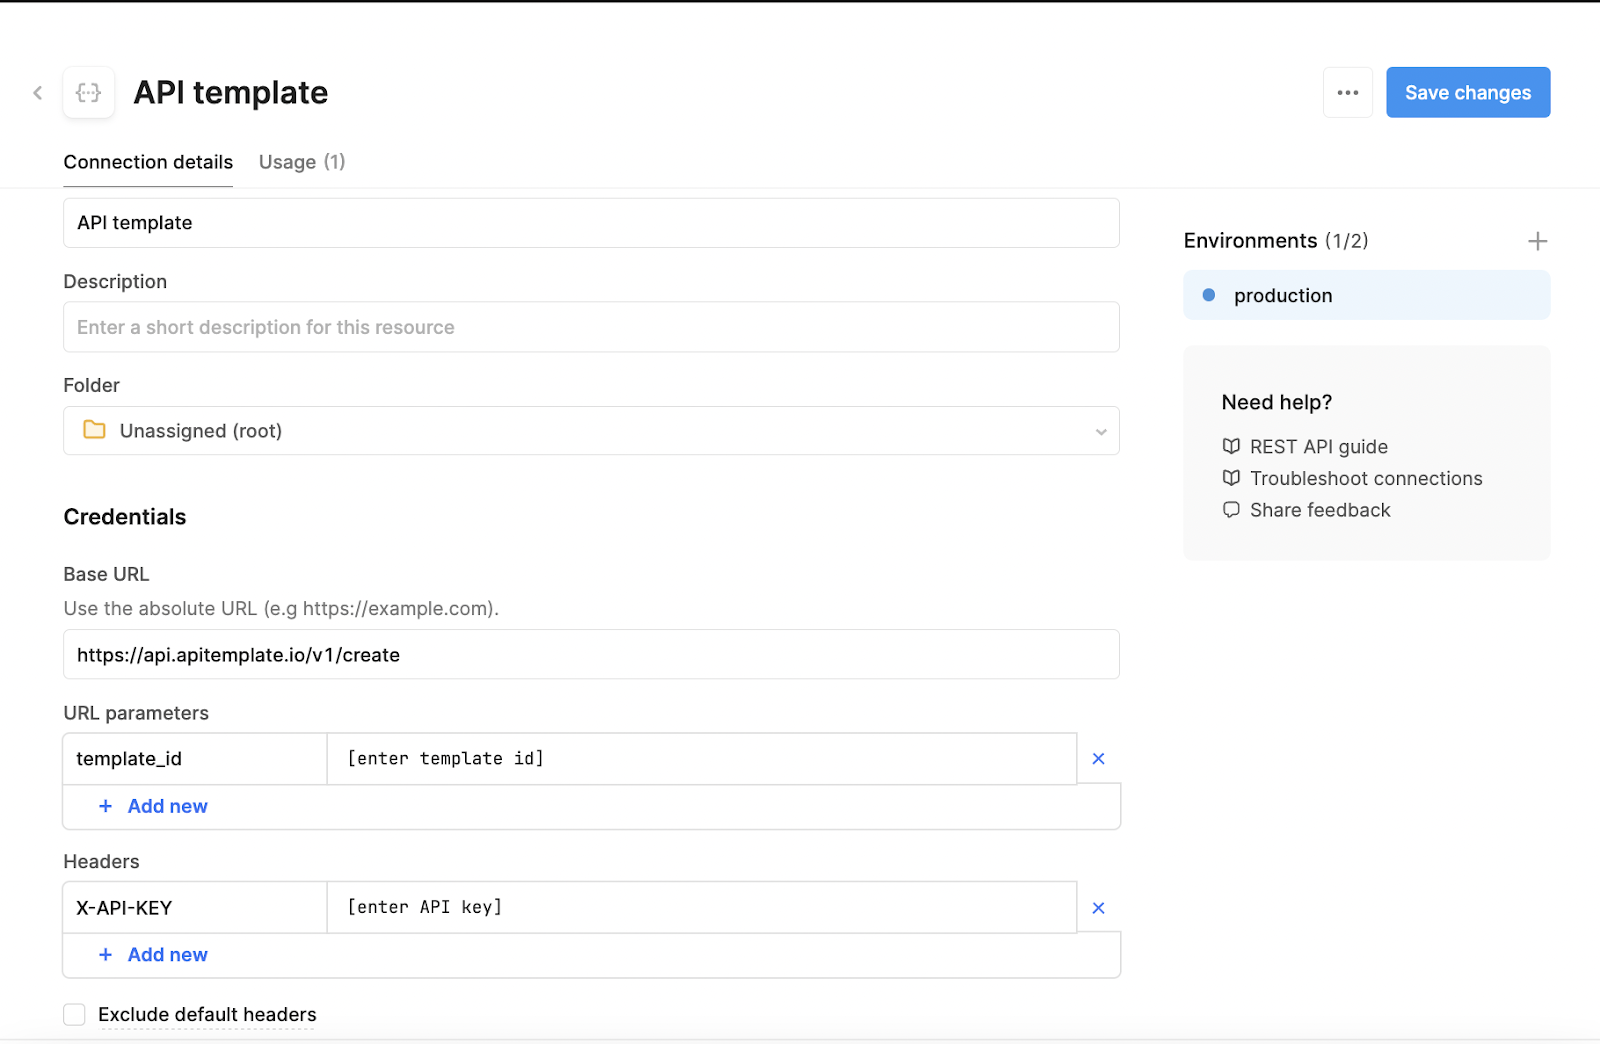
For the next step we go back to Retool and create a new resource.
- The base URL to enter is https://api.apitemplate.io/v1/create.
- In URL parameters, the key is template_id and the value is your template ID.
- In the Headers box, the key is X-API-KEY and your API key is the value.
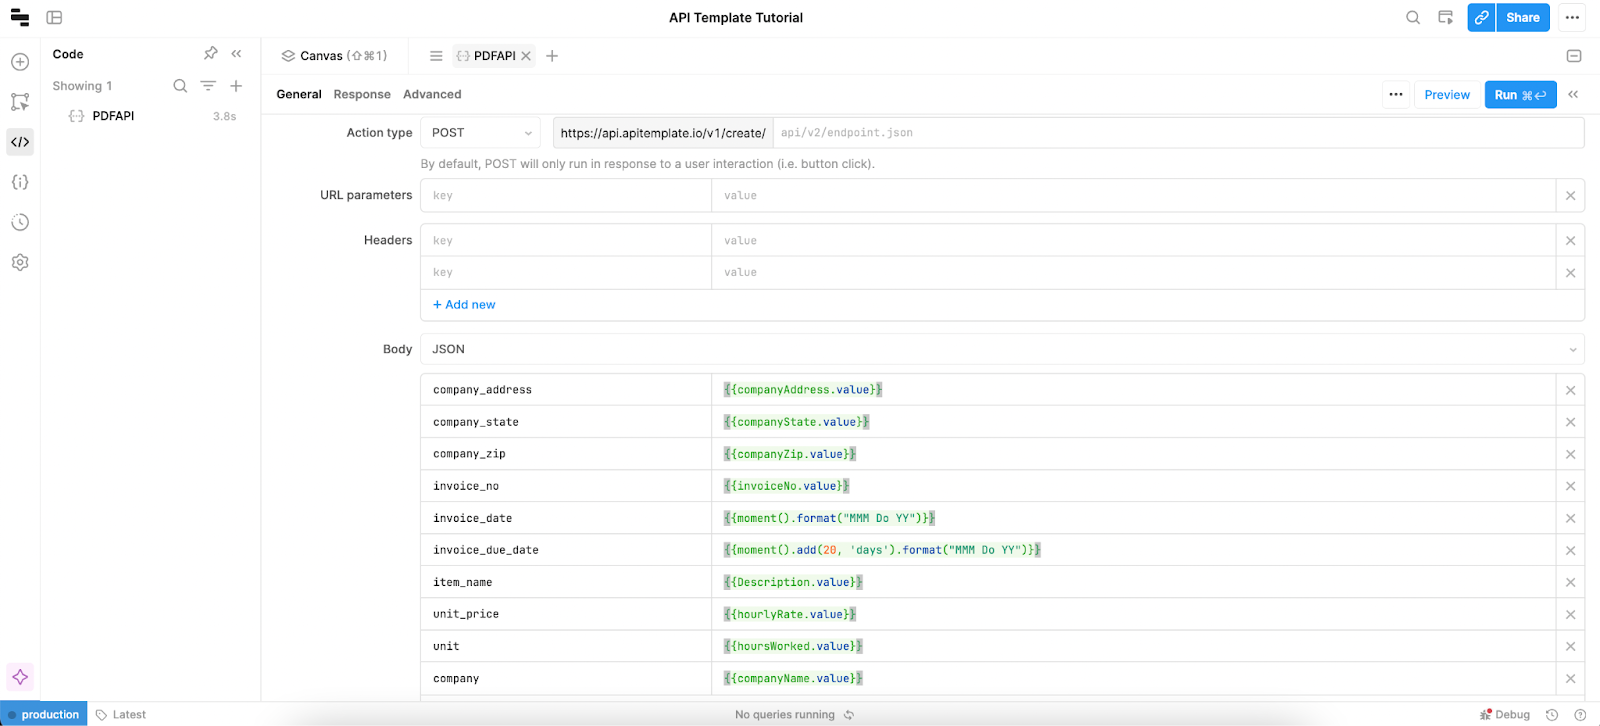
In the query section of your app, you’ll use this REST API to make a query. The query type is POST, and the Body is where you’ll introduce your dynamic values.
In order to fill these values, we created a simple form within our invoicing system to allow users to input the data.

Within the Body of the query, we matched the component names and values to the references in the JSON of the PDF template.
Here is what the query looked like with our input values. To generate the invoice dates and due dates we used the moment() library to generate today’s date, and a date in 3 weeks time.
Once run, the query should return a download URL. To preview the PDF, we pulled in a PDF viewer component and referenced the API response:
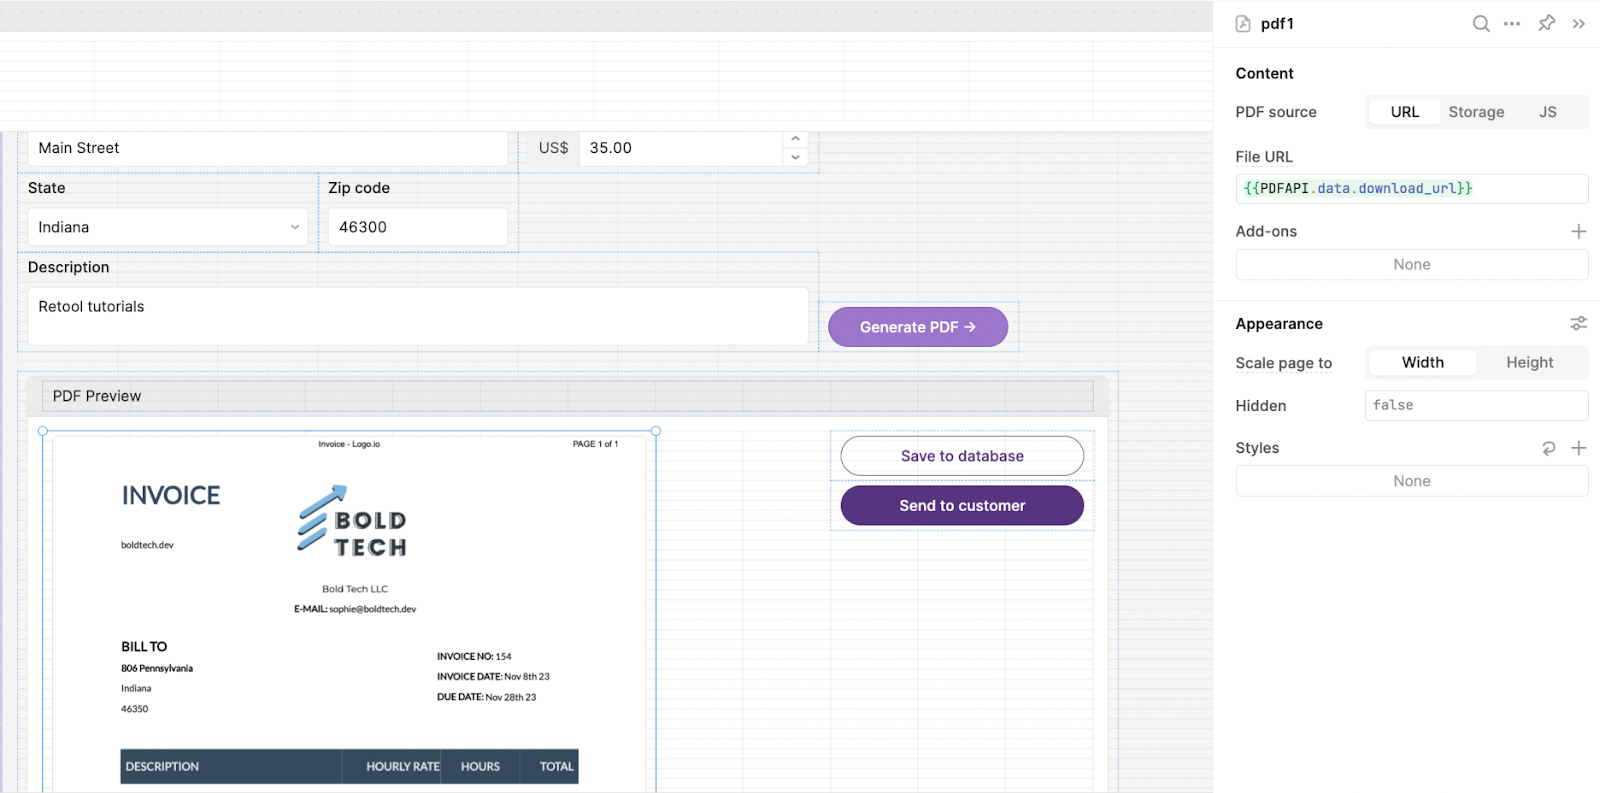
With that, you have a simple invoice generator app using the APItemplate.io external API.
There are, of course, many other API's that offer PDF generation, and we will keep this list updated with the best options as we find them. If you have any suggestions, please email us!


