

When building internal tools screen real estate is incredibly valuable, and so it’s important to position components as dynamically as possible to optimize for user experience. Creating collapsible elements in your layout, which hide away when out of use, is a great way to avoid creating apps that spill down the page, causing users to scroll unnecessarily, wasting time, and leaving margins for error.
Retool is great for automatically adjusting components across vertical space, (i.e. components move up if something collapses above) however, there is not yet any in-built functionality for space adjustments horizontally, such as to collapse a side container.
Luckily for you, we have a great hack to do this yourself in just a few steps, using a temp state and hidden components, to create a hideable sidebar such as this one:
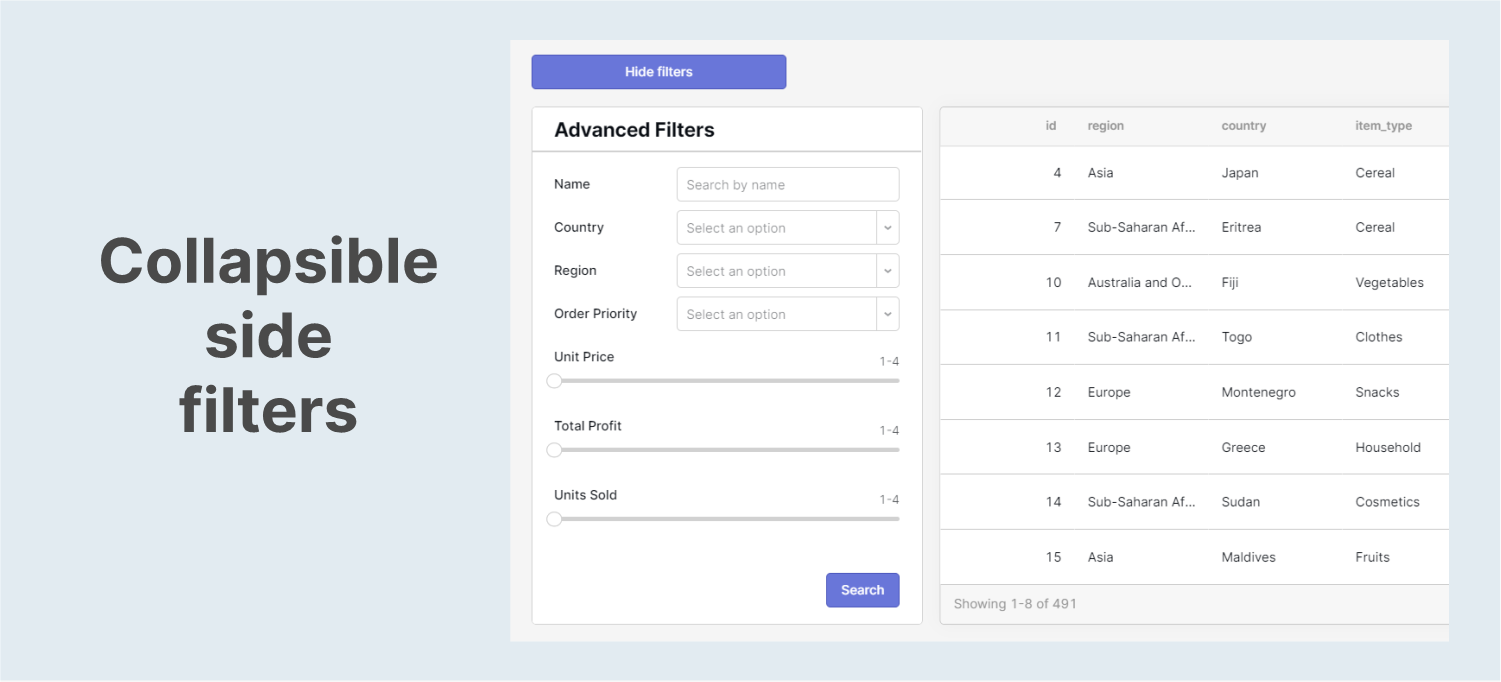
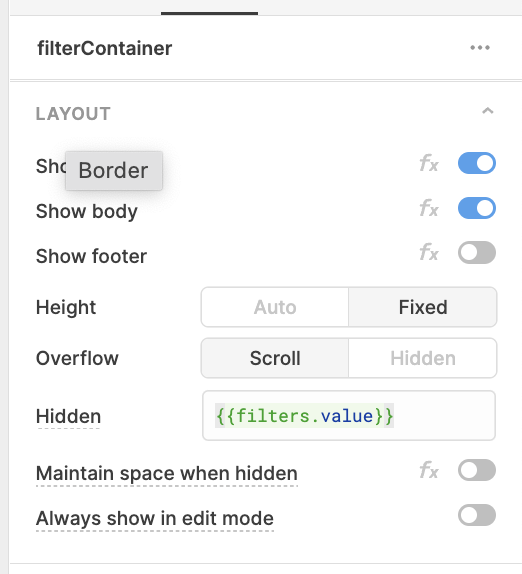
This space is super useful for things such as advanced filters, extra charts or data, or extra actions that aren’t always needed.
It’s good, right? We think so too - this is a Bold Tech favorite hack. This tutorial should only take you 15 minutes or so, so let’s jump in and get started!
For this example, we are going to use a simple table with data, where we want to add some more complex filters in a collapsible sidebar, which we’re tucking away to the left of our table. If you don’t already have an app you’re using for this tutorial, pull in a table component with some dummy data, like so:
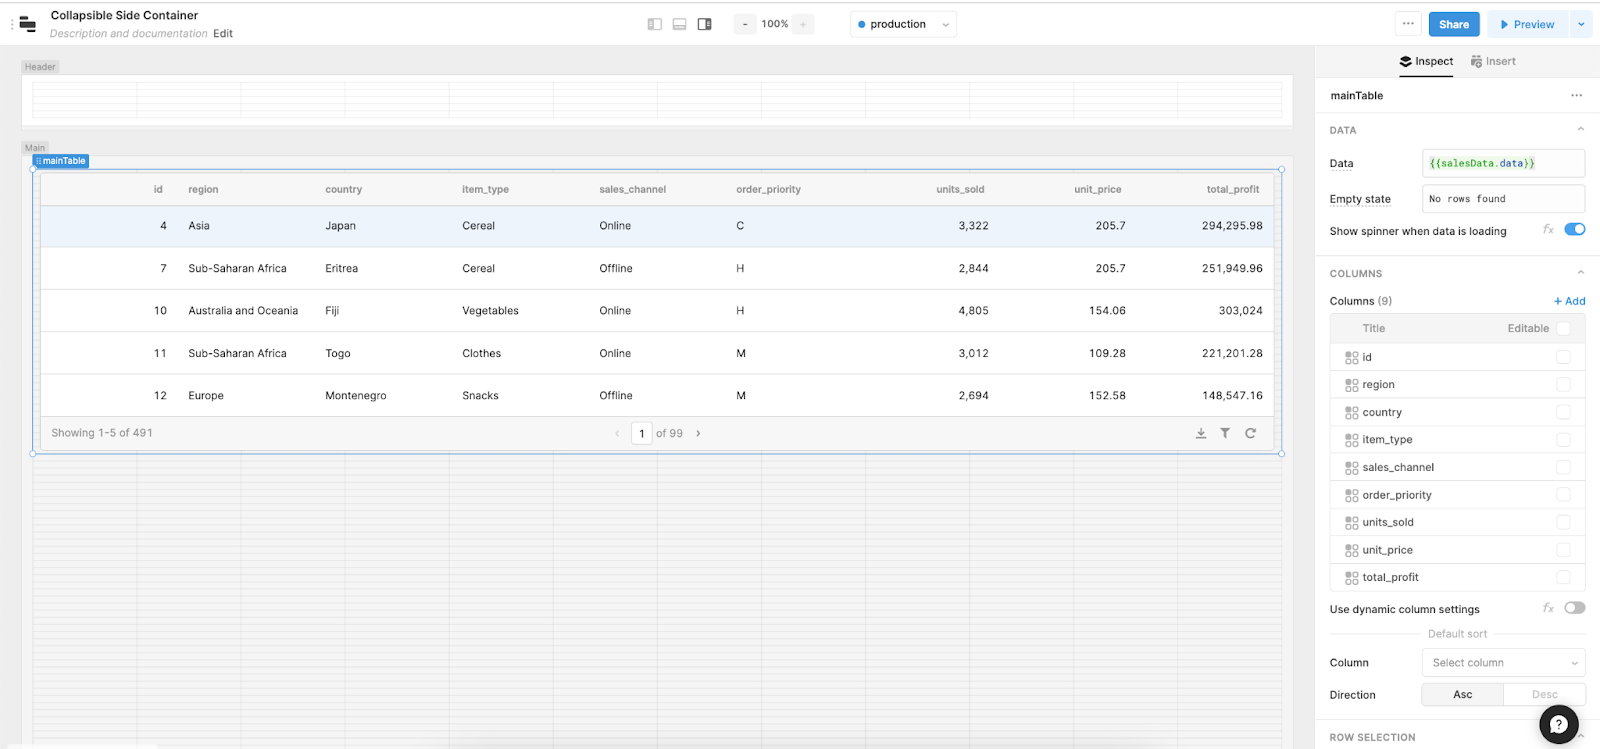
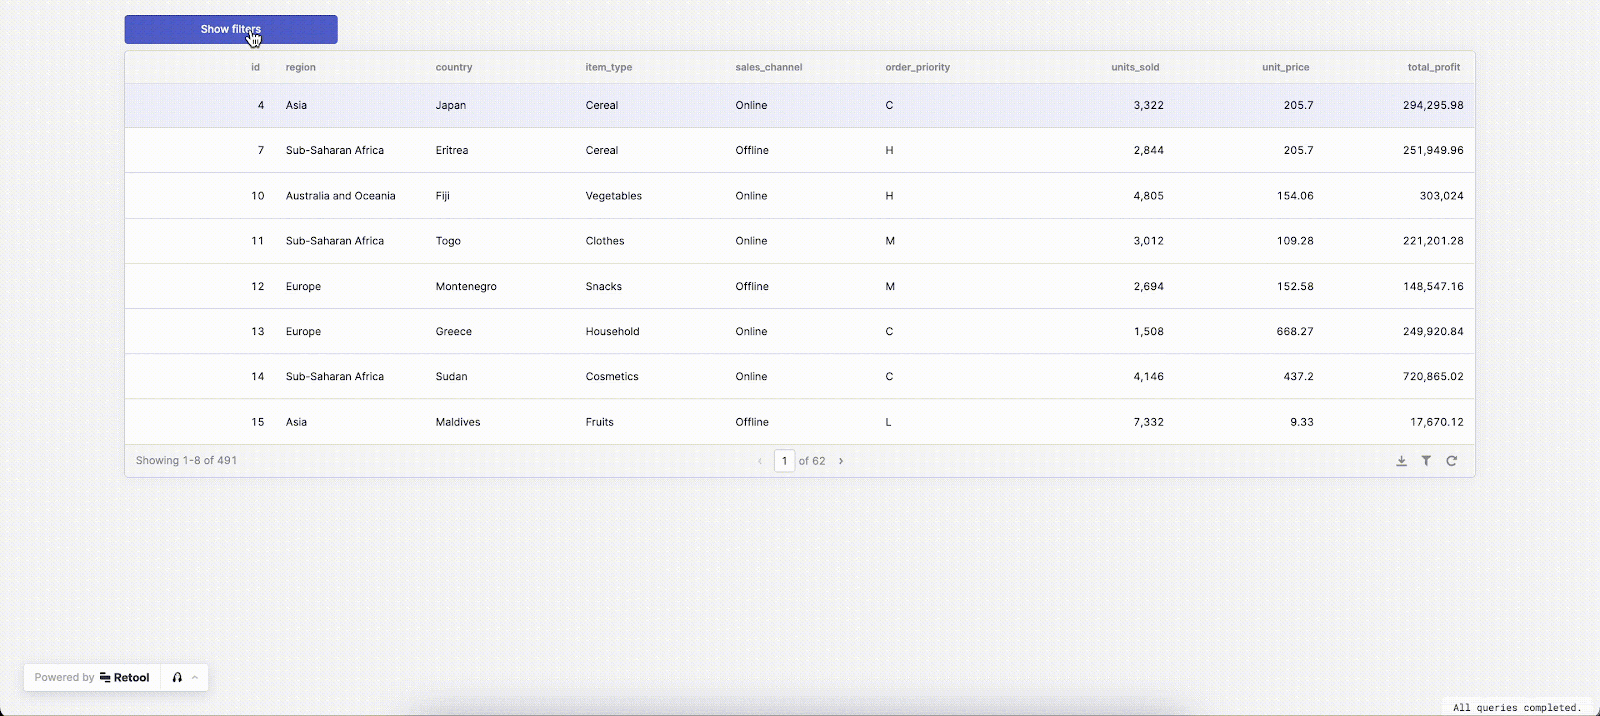
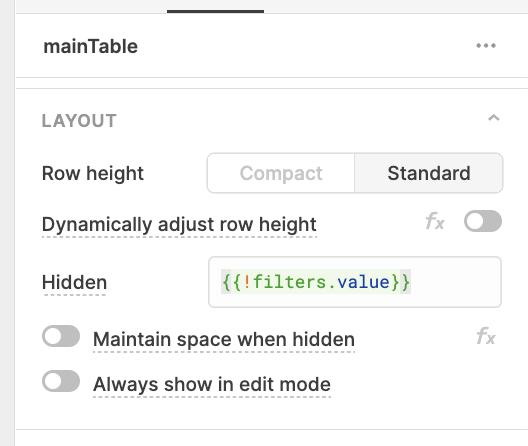
This trick works by using two different table components and a container, which are alternately hidden and shown through the click of a button, which changes the value of a temp state. So for this full-width table we’ve just pulled in, let’s make sure to call the component ‘mainTable’ in the right-hand component inspector for clarity.
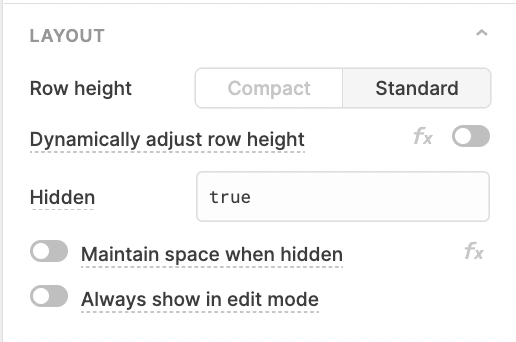
Next, set the mainTable to be hidden by typing ‘true’ in the ‘Hidden’ value box.
In its place, pull in a container and a button to the side, and another table component next to them. The button should sit above the hidden ‘main table’ so that it remains in place when the container is hidden and the layout adjusts.
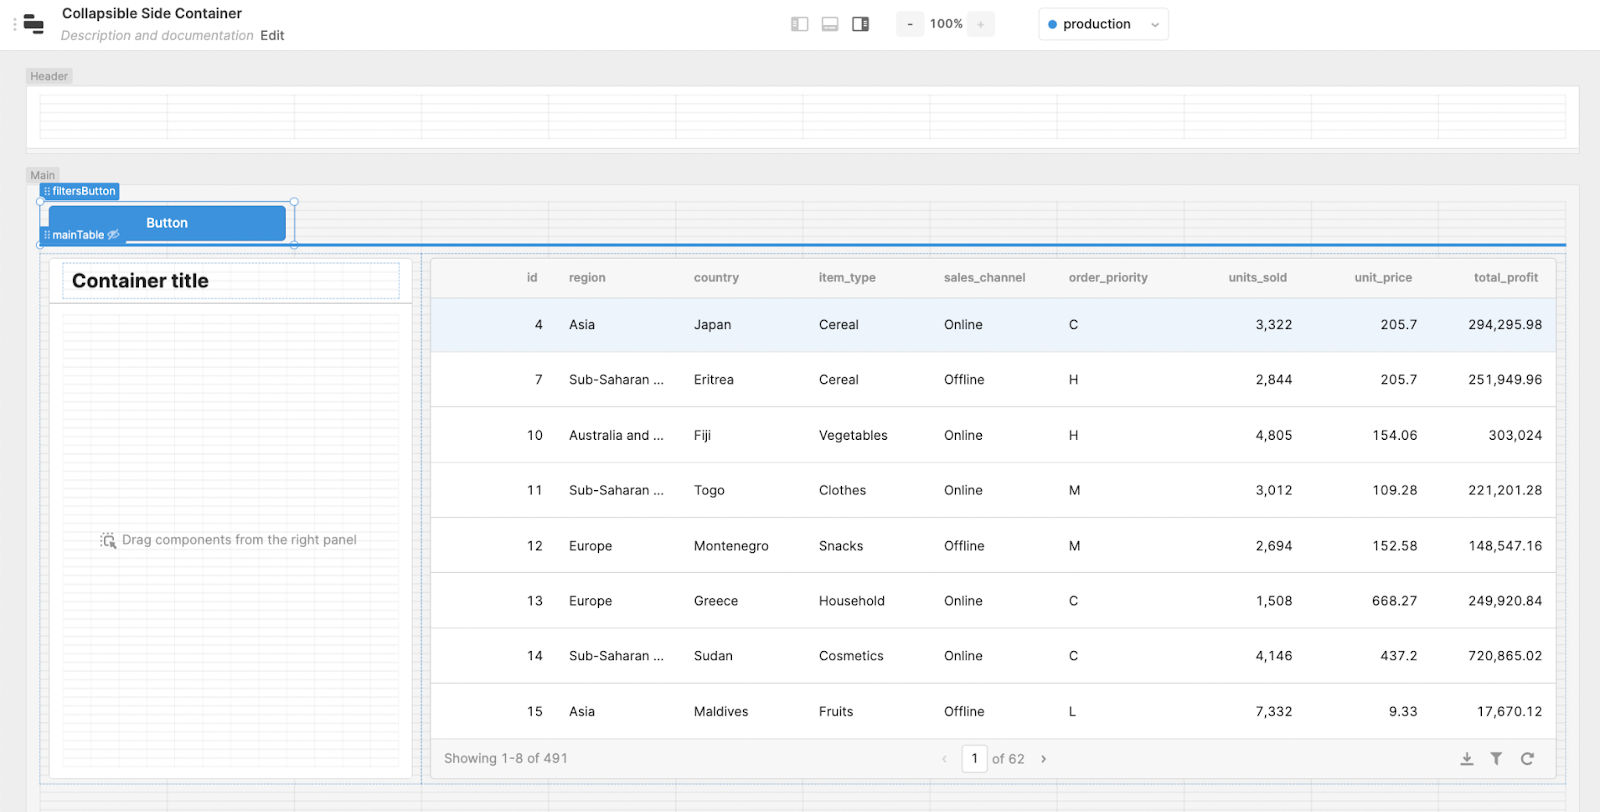
Make sure to name the new table to be something clear, such as ‘filterTable’, as this will be the table component that shows when the side container is expanded. Connect the data in this table to the same query as your mainTable.
Next, create the temp state by clicking ‘Create new’ under ‘Temporary State’ in the left-hand inspector. Set the initial value to ‘true’. Note, if you decide to use more than one collapsible element, you'll need to use something other than a boolean to define the state, such as 'main', 'filters' and 'details'.

When the button is clicked, this temp state will switch between true and false to determine the width of table component that is shown. The state will be true when the mainTable is used (full-width) and the sidebar is collapsed, and false when the filters are expanded and the smaller filterTable used.
Let’s add an event handler to the button to reverse the value of the temp state on click:
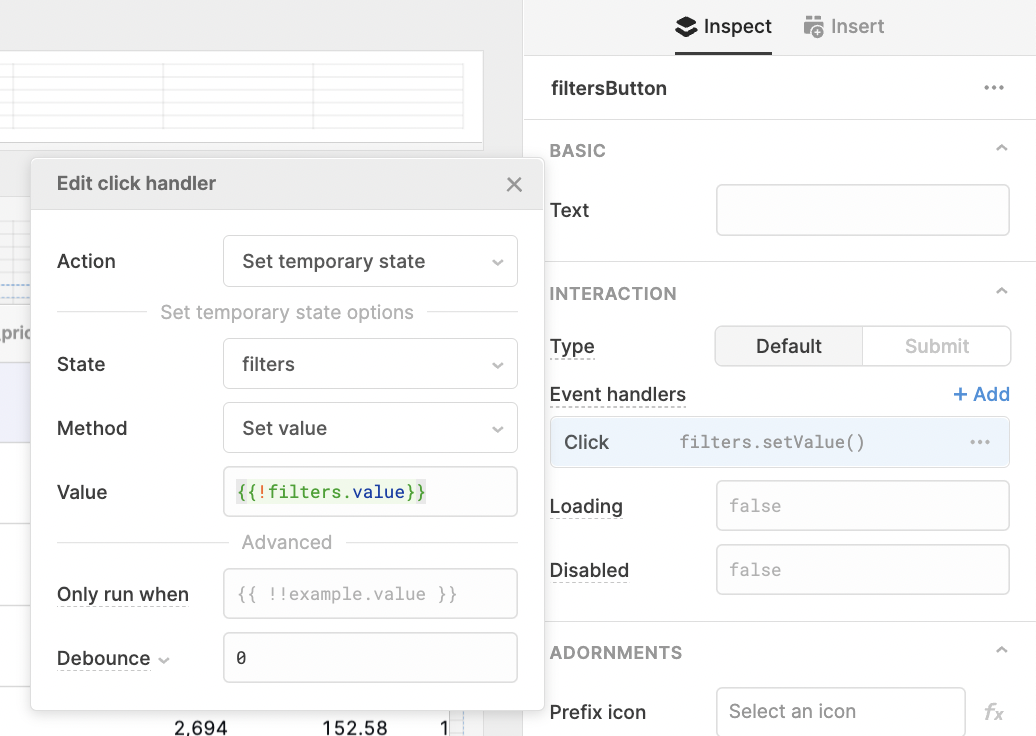
Again, if you are using different values than true/false for your temp state, you’ll need to write out a ternary clause to switch the values.
Let’s also change the button text to reflect these changes, for better UI:
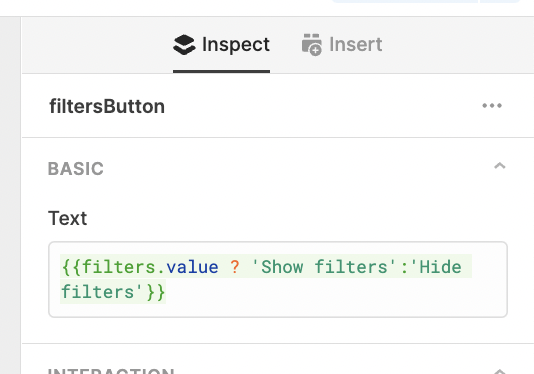
Now, when you click the button, the text should change along with the value of the temp state.
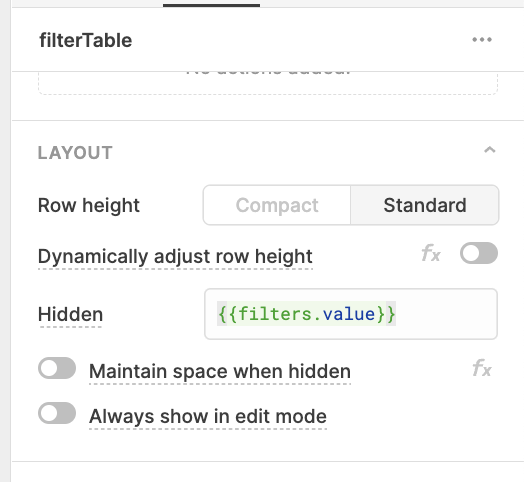
For the final steps, we’ll make sure the container and filterTable both hide when the filters temp state is set to true:
And set the mainTable to hide when the filters temp state is set to false:
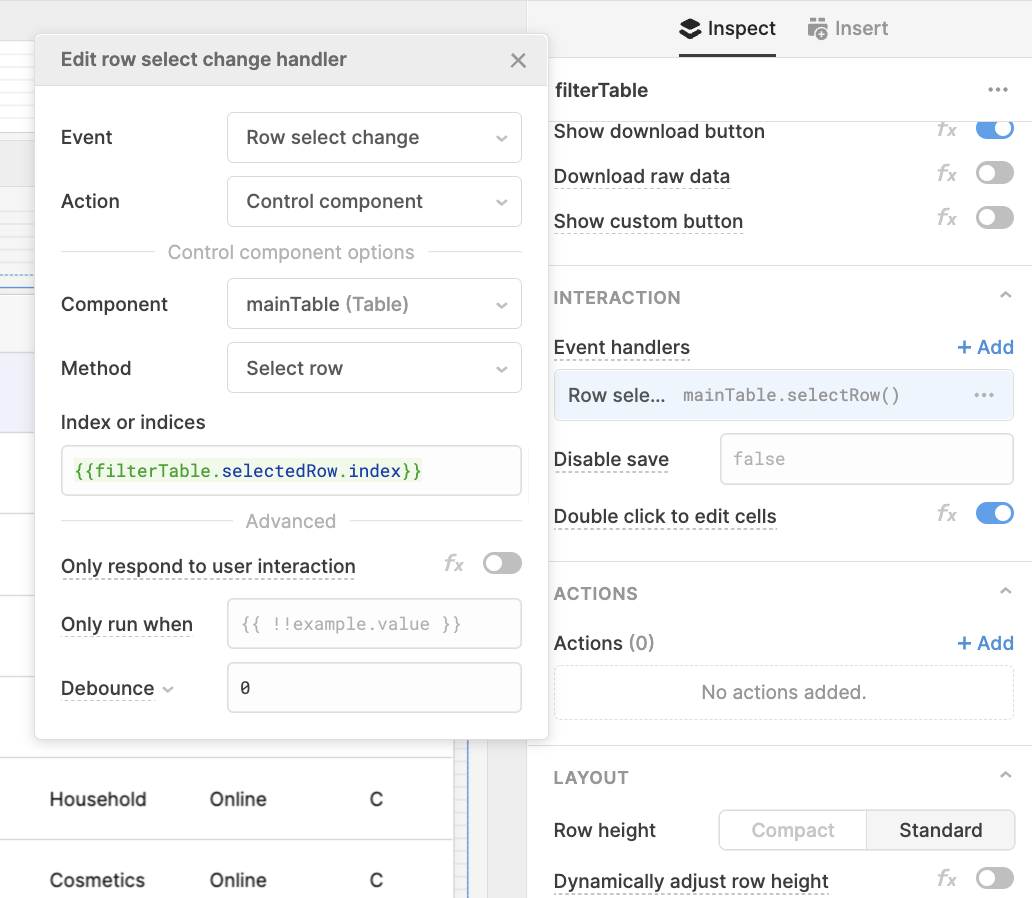
Now, we’re almost there, but not quite done yet, since for good UI we need to ensure the smoothest transitions between the two: matching the table sort, as well as the index of the selected row, and the selected page. We need to make sure that these match across both tables so that when you switch between views, the data stays fixed.
To explain with an example: if you are using this layout for expanding read-only views in a side panel, you want to make sure that when the user selects a row in the full-width table view, this same selection populates to the smaller-width table when it opens too.
To do this, you’ll need to set up a series of simple event handlers.
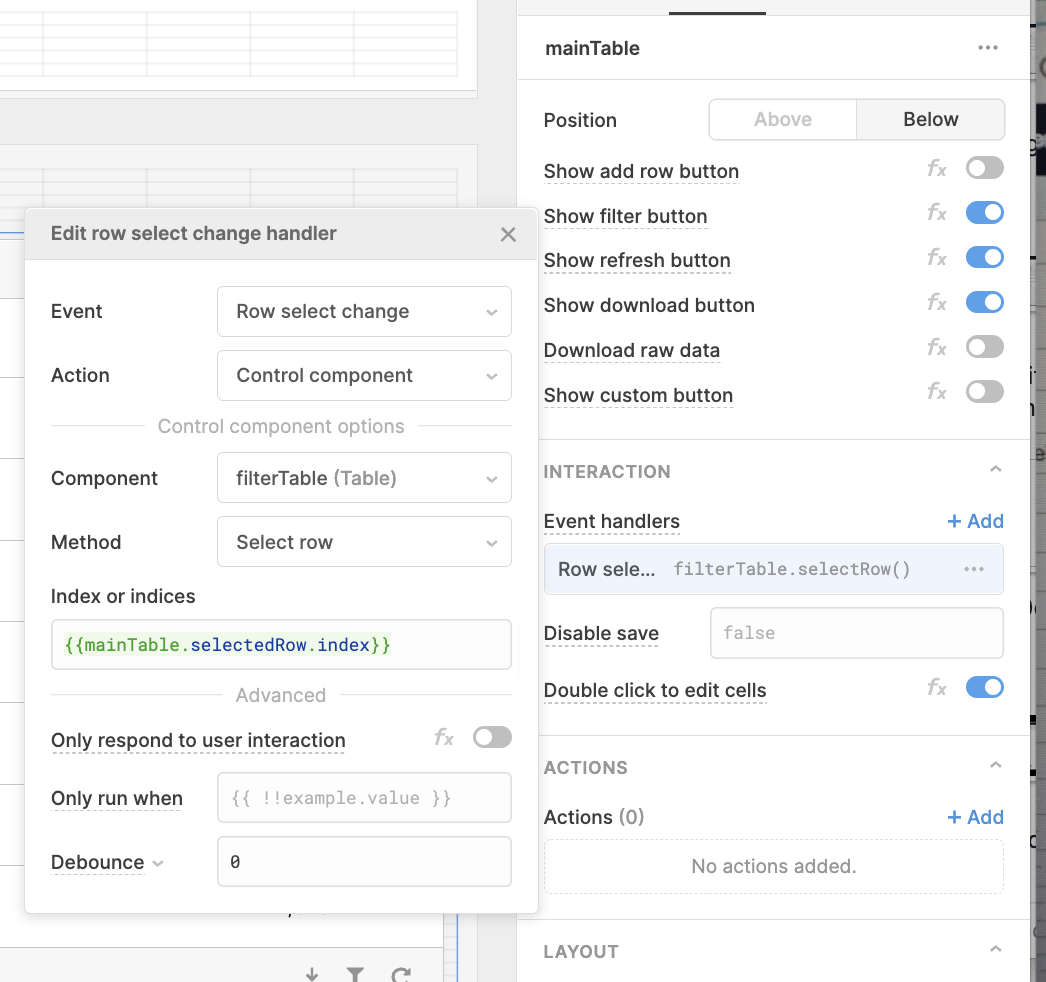
For the selected row, add an event handler to each table that fires on selectedRow change. Set this to change the selectedRow index of the other to match, as below:
Make sure to do this in both tables (main and filter) inversely:
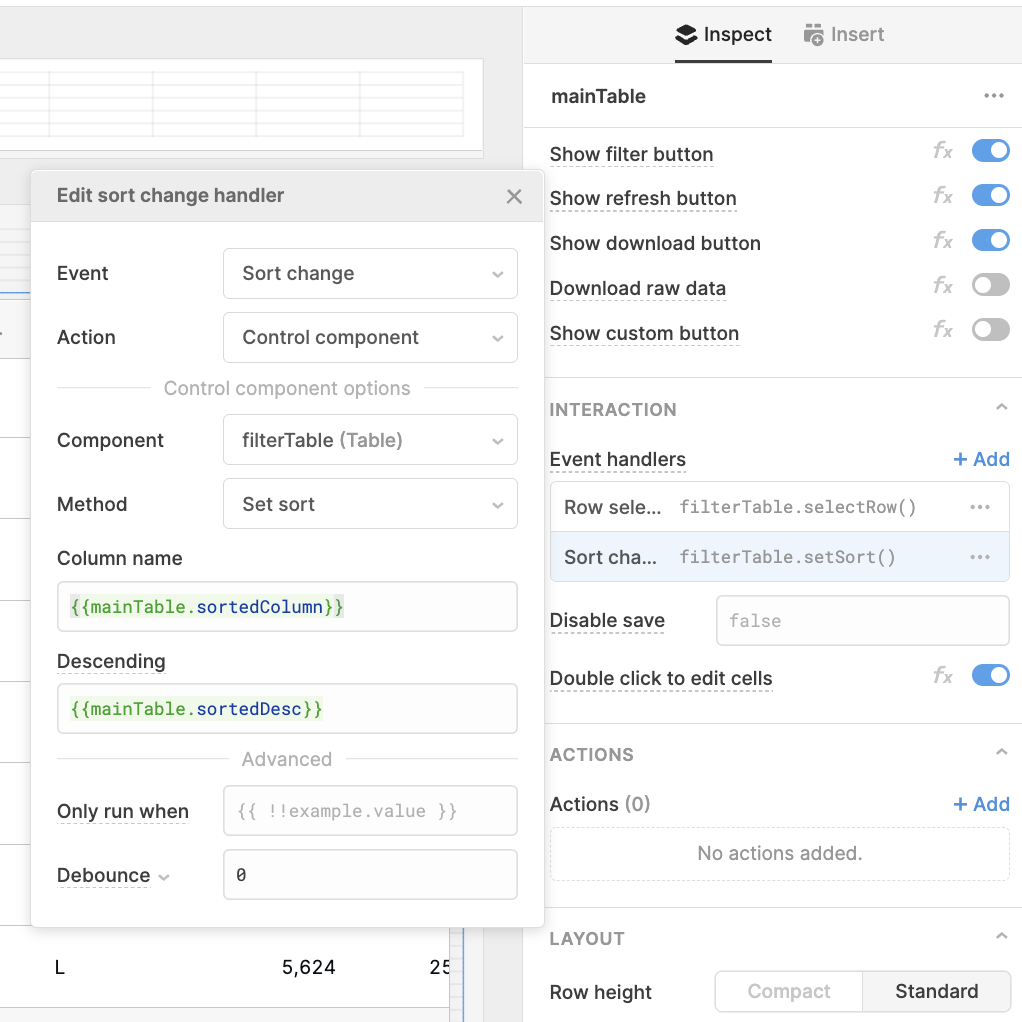
Next, set up the sort to match across both, by setting an event on ‘sort change’ to match the column and the order:
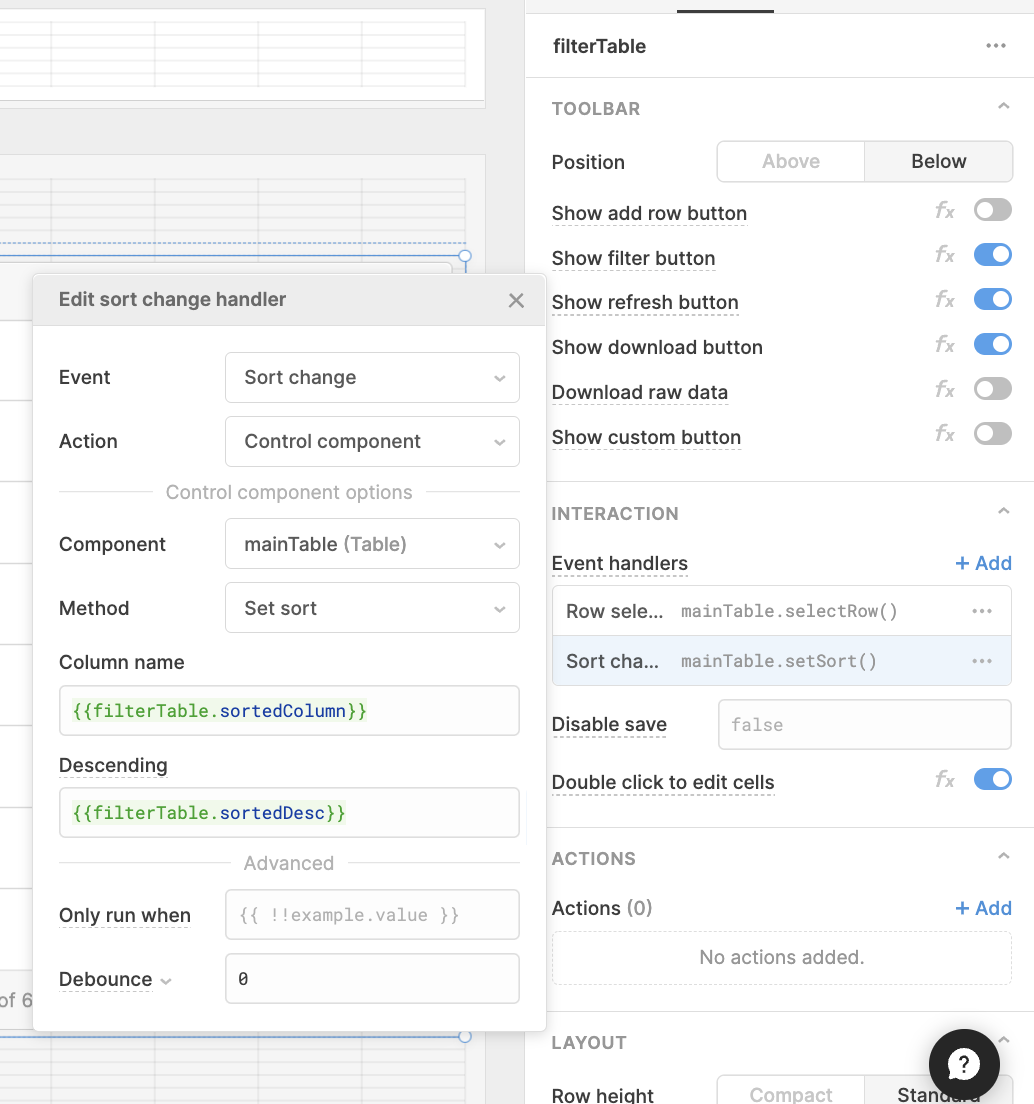
And again, do the opposite in the other table:
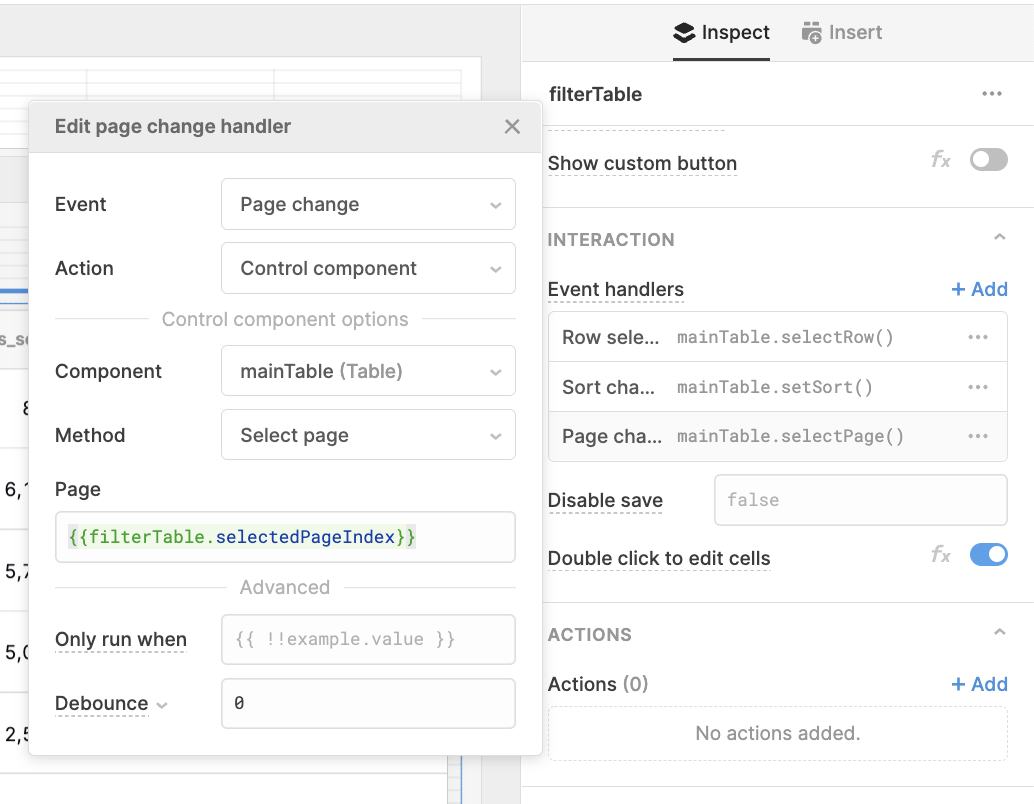
Finally, set the page to change as well, be the table.selectedPageIndex:
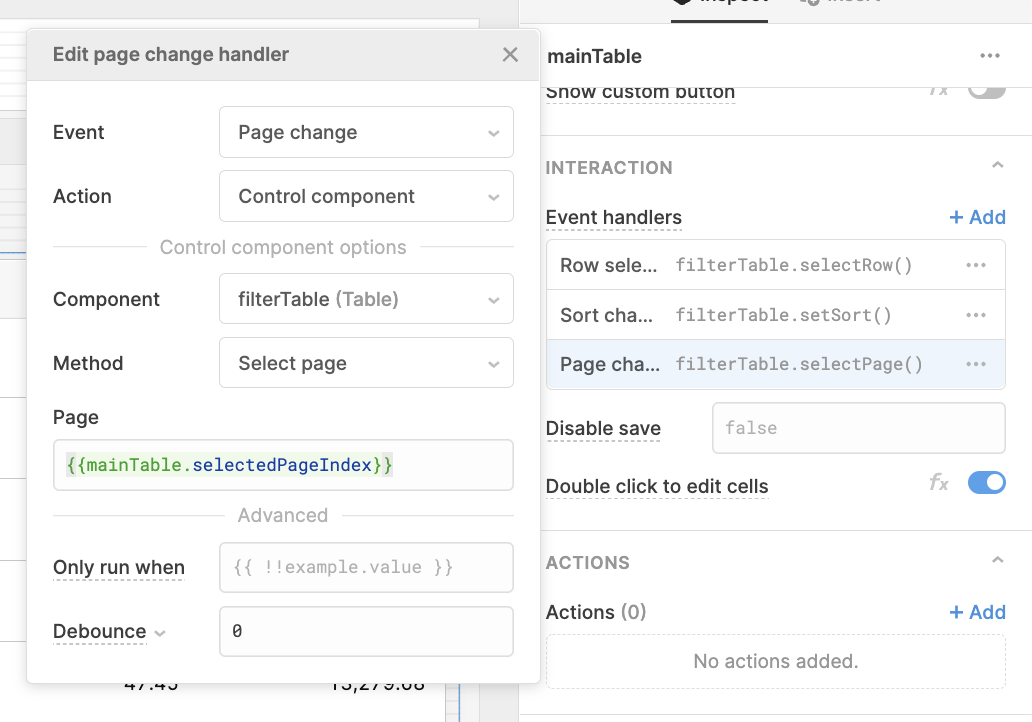
And, once more inversely:
You may also need to perform these actions if you are using table filters frequently, or selecting cells specifically: these can all be done in the same way using the event handlers.
This trick can be used beyond just a container/table layout, even with three tables and collapsing elements on each side, but do be sure not to overcomplicate things, as all of these duplicate elements need to perform exactly the same actions and pull from the same queries. So, the more complex this component is, the harder to debug two different, overlapping components at the same time.
Since everything needs to work exactly the same in both tables, it’s best to add this UI feature towards the end of your development process, as you’ll need to perform each change to the table component twice from then on.
Happy creating! If you use this hack, we'd love to know - tweet us at @bold_technology!
Bold Tech's expertise and commitment has been instrumental to our growth. With their help, we've been able to build and iterate quickly, navigate complex development challenges, and reshape internal workflows/tools for greater efficiency. Working with Bold Tech has been a game-changer for our organization. They're an indispensable partner, and we highly recommend working with their team!

Bold Tech was an exceptional resource in helping us implement Retool for our organization’s compensation planning process. Bold Tech was available to troubleshoot and resolve issues at a moment’s notice, which was very comforting during a highly stressful and busy time for our organization. The Bold Tech team were a pleasure to work with and I sincerely hope I get the opportunity to collaborate with them again in the future!

We build internal tools, fast.


